eSIM on iPhone: How to install with QR code
Step by step indications to set up your eSIM on your iPhone

- +0 32
-

-


You may have heard that eSIM is the latest way to easily get an internet connection during a trip overseas. It is quickly becoming recognized globally for being simple to install, easy to use, and relatively cheap.
However, because it is a relatively new way of getting an internet connection, there are still many people who are not sure how you can install this eSIM as well as how to activate it to use during your trip to, say, Japan.
In this article, I will share with you how to install an eSIM on your iPhone as well as how to activate it. I’ll explain how to install it using a QR code as well as how to do it manually.
If you happen to use an iPhone instead of an Android phone, check out our other article where we show how to do the same thing for iPhone.
What is eSIM
As you may already know, getting a SIM card is one of the main ways to have an internet connection easily when traveling abroad. eSIM is similar, but the difference with regular SIM is that you don’t need to purchase and install a physical card to get an internet connection.
The word eSIM stands for “Embedded SIM”. This has been a thing since 2016 and most mobile phones nowadays will have this feature. The eSIM is cheaper since it doesn’t require a physical card and is easier to install; you only need to scan a QR code or install an app on your mobile phone.
For more information about eSIM and some of the best services that provide this, be sure to check out the following article!

Two Ways of Installing eSIM
Now that you know the basics of eSIM, let me show you how to install an eSIM on your iPhone. There are two main ways to do this which are either by using a QR code or manually. In the case of QR code installation, things are a little different depending on the iOS of your device (whether your device is before or after iOS 16). Be sure to check which iOS you are using on your iPhone beforehand.
Note before installing eSIM
Although eSIM is convenient and easy to install, there are a few things you should check before purchasing an eSIM.
First of all, be sure that your iPhone is compatible with using eSIM. Also, check beforehand that your iPhone is not carrier-locked. Lastly, be sure that you have a stable internet connection when making the installation. Some QR codes can only be used once, so if there is an error during the installation process, you might not be able to retry it, so be careful. Another thing that is recommended is to be sure that the iOS of your iPhone is the latest.
Method 1: QR Code Setup
Here are the instructions for setting up your eSIM to your iPhone using a QR code. First, I will show you how to do it on an iPhone with iOS that is before iOS16. Then I will proceed to show you how to do it on an iPhone with iOS that is after iOS 16.
Before iOS 16
1. Go to “Settings” on your iPhone
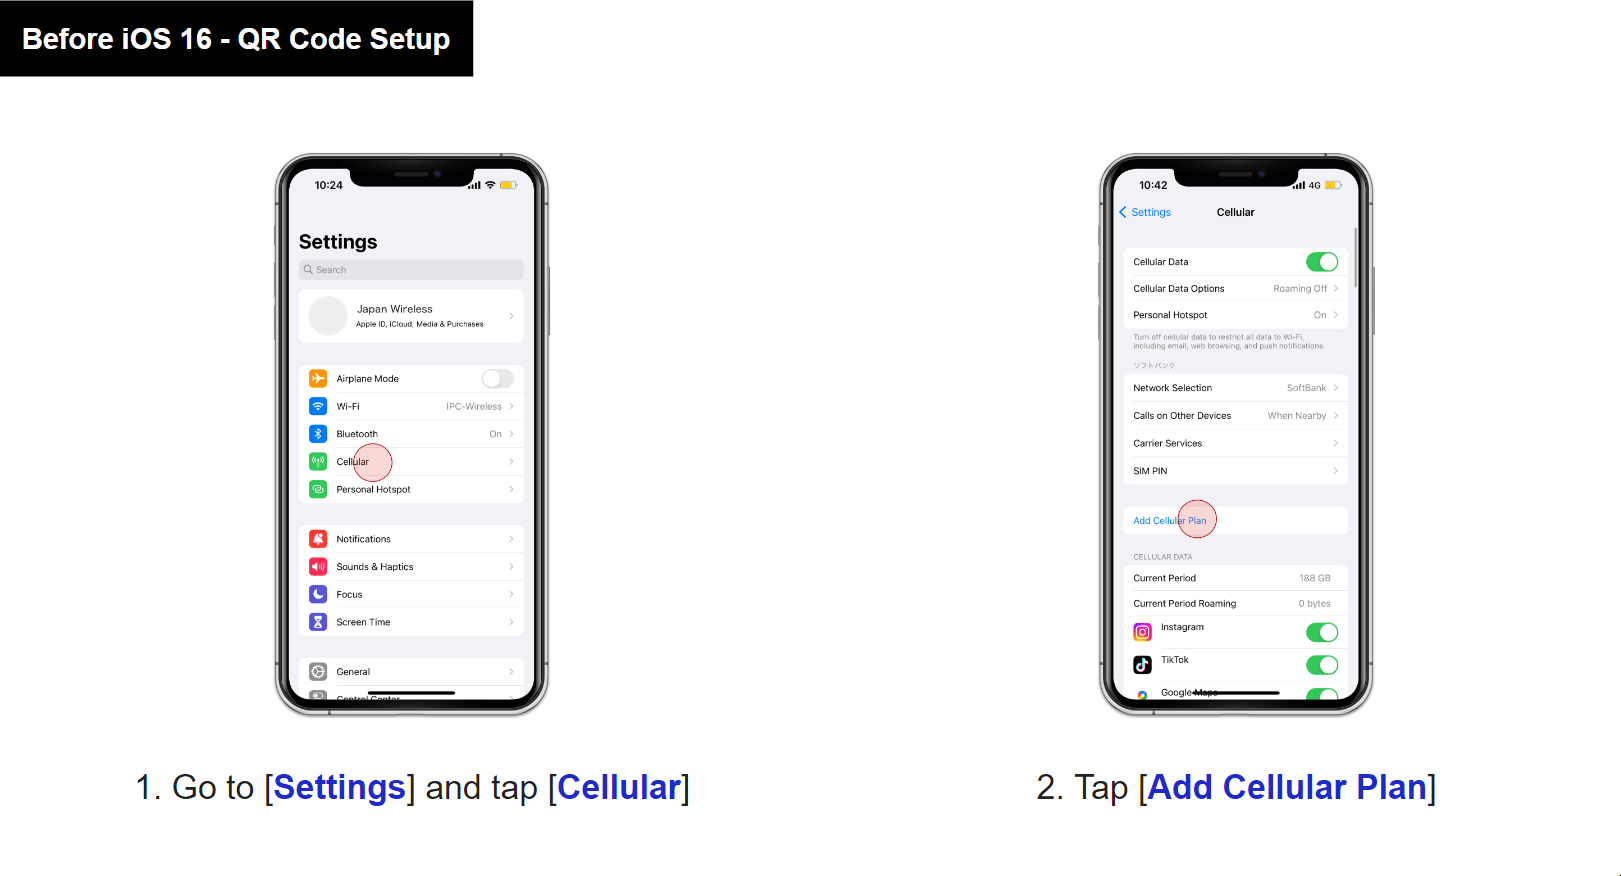
First, go to the Settings screen of your iPhone. From there, tap on “Cellular”. There, tap the “Add Cellular Plan” to go to the scanning screen.
2. Scan the QR code
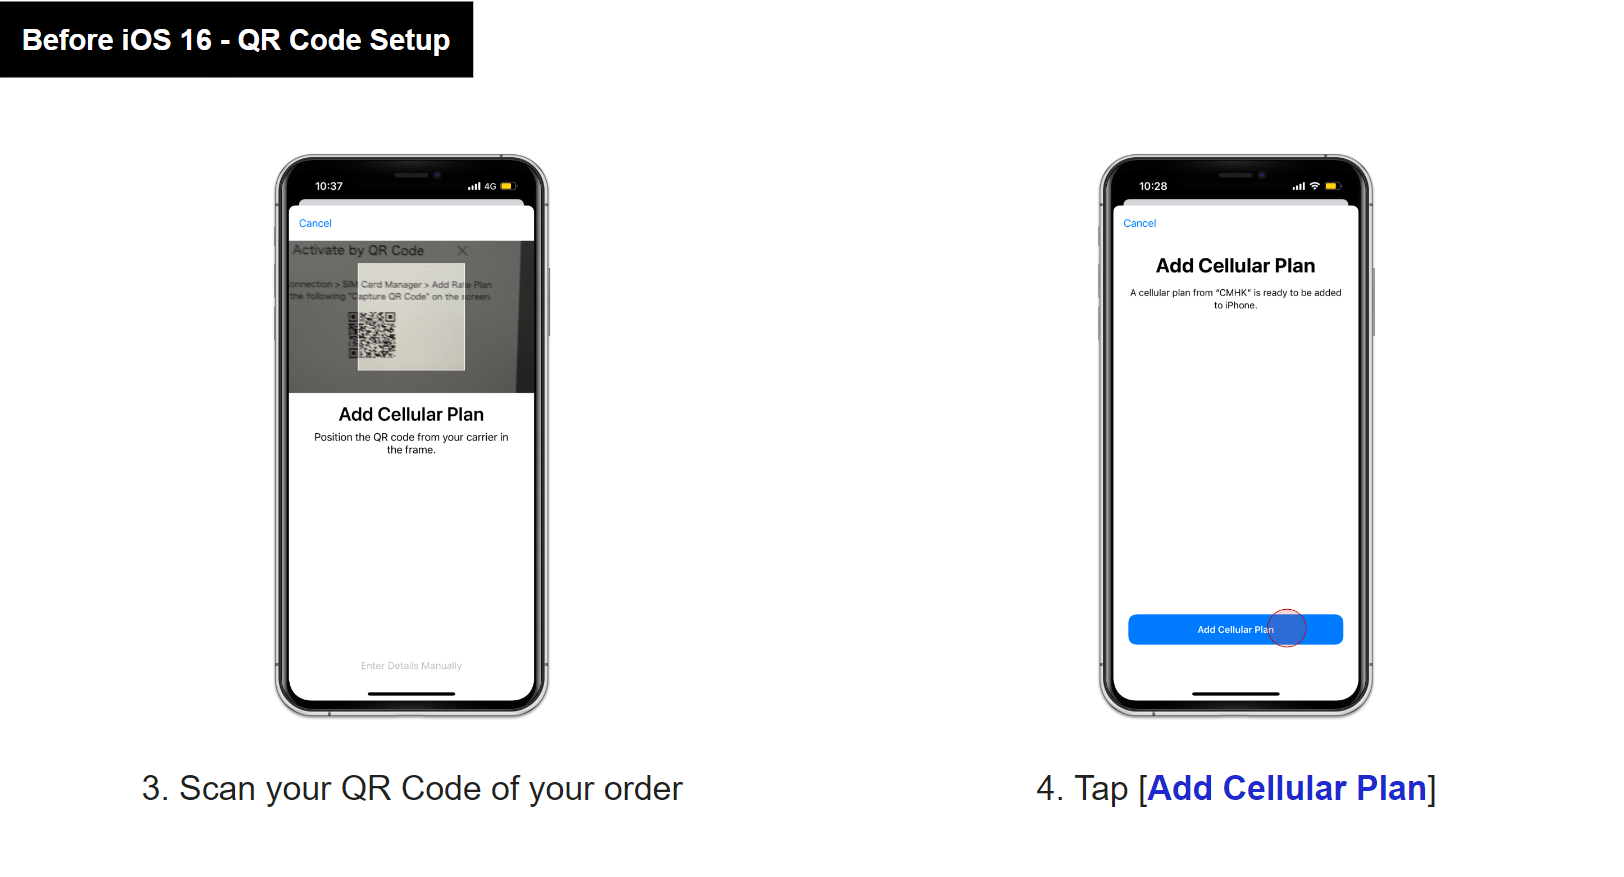
Once you are at the scanning screen, scan the QR code that is provided to you by the eSIM service. As I previously mentioned, be sure that you have a stable internet connection when installing this eSIM. Once you are ready, then tap on “Add Cellular Plan”. The download process may take a few minutes to complete.
3. Set up Cellular Plan
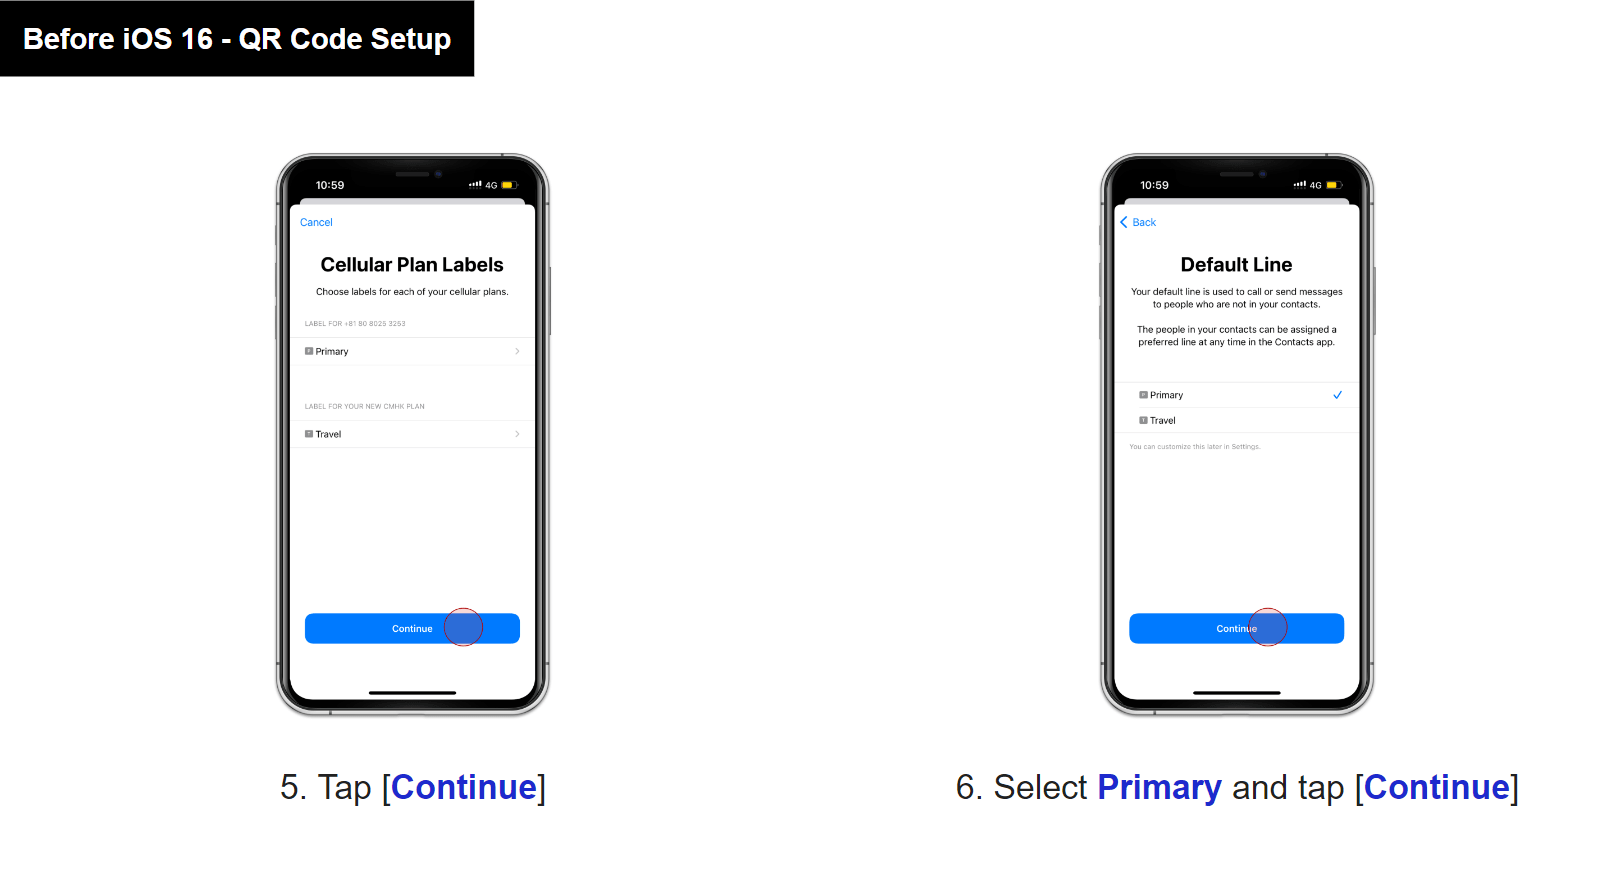
From here, there are a few screens you need to check before using your newly installed eSIM. First, on the Cellular Plan Labels screen, tap “Continue”. Then on the Default Line screen, select “Primary” and then tap on “Continue”.

Then, on the iMessage & FaceTime screen, select “Primary” and tap on “Continue”. The next screen that will appear is the Cellular Data screen. Here, select “Second Choice” and tap on “Continue”.
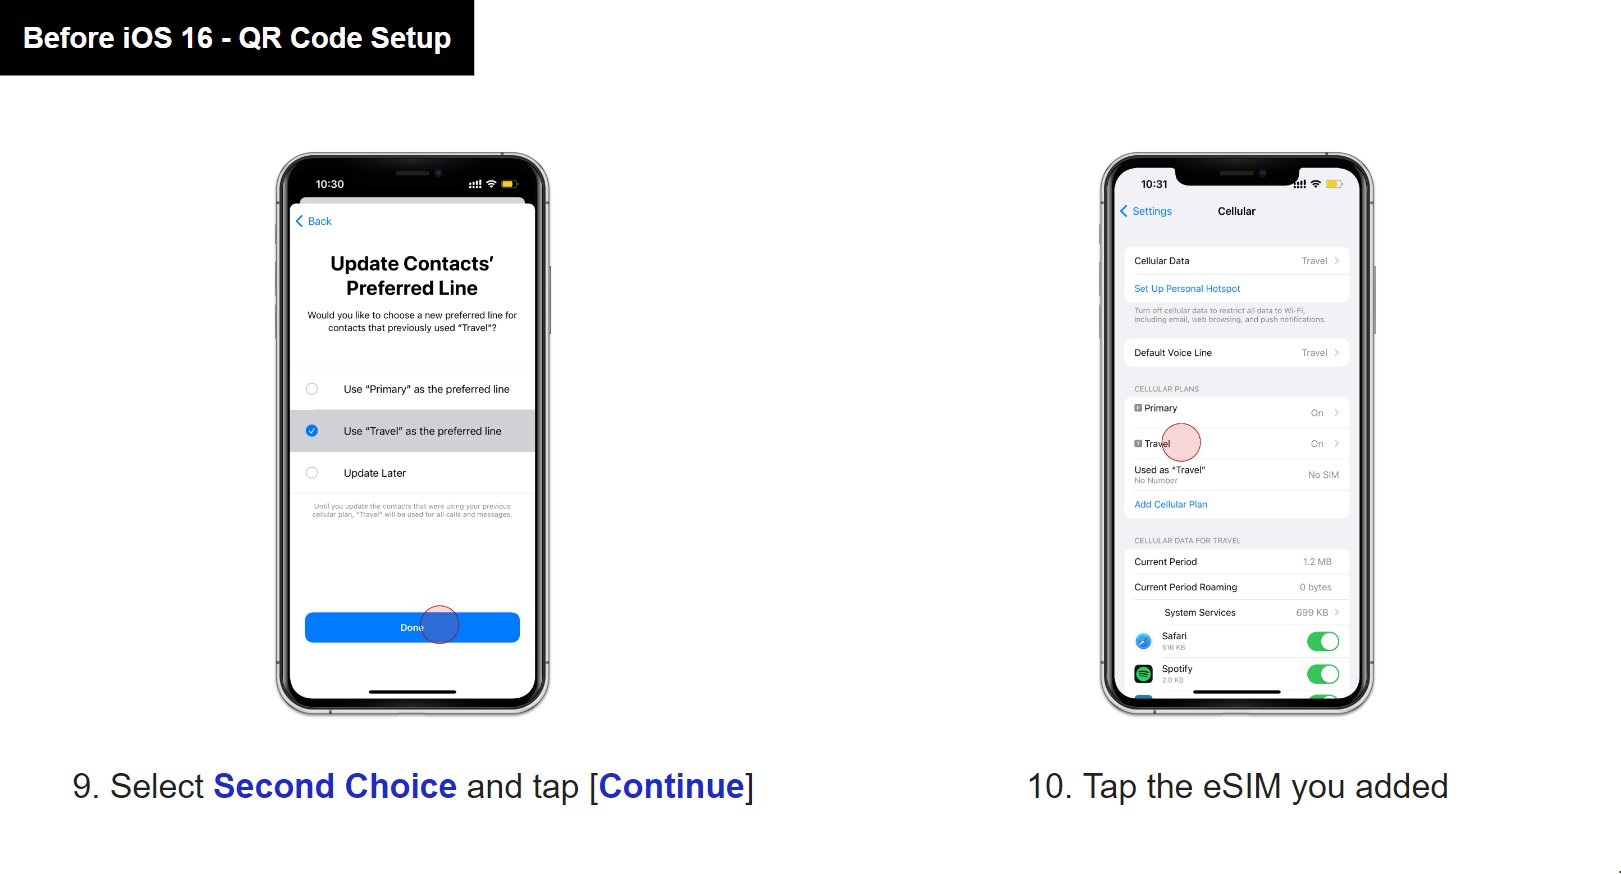
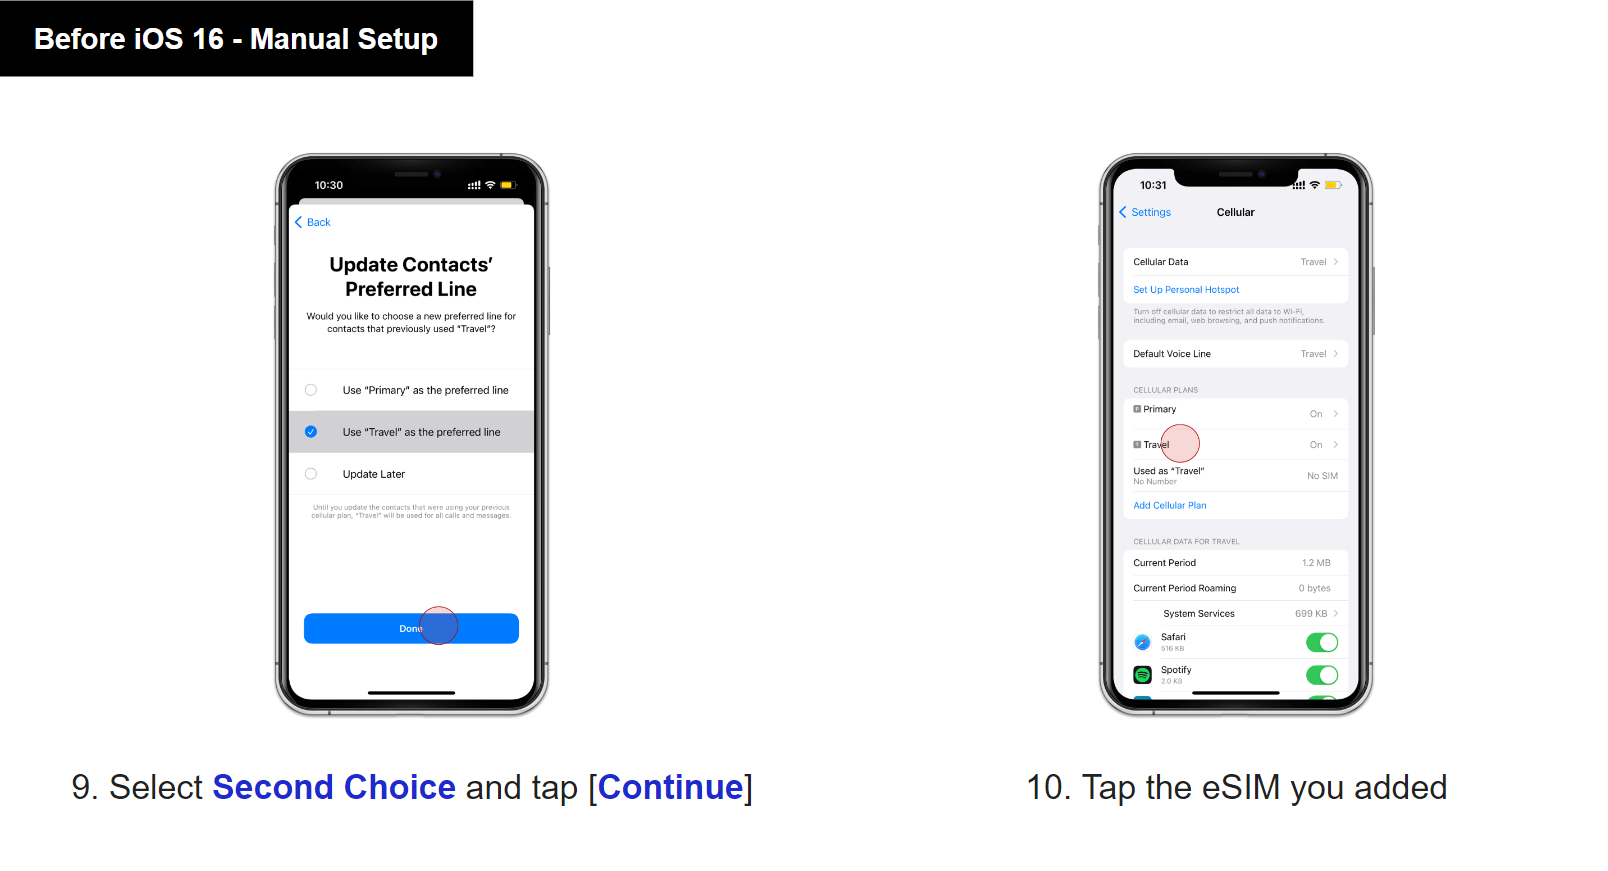
The last of this string of screens is the Update Cotracts’ Preferred Line screen. Here, select “Second Choice” and tap “Continue”.
4. Activate eSIM
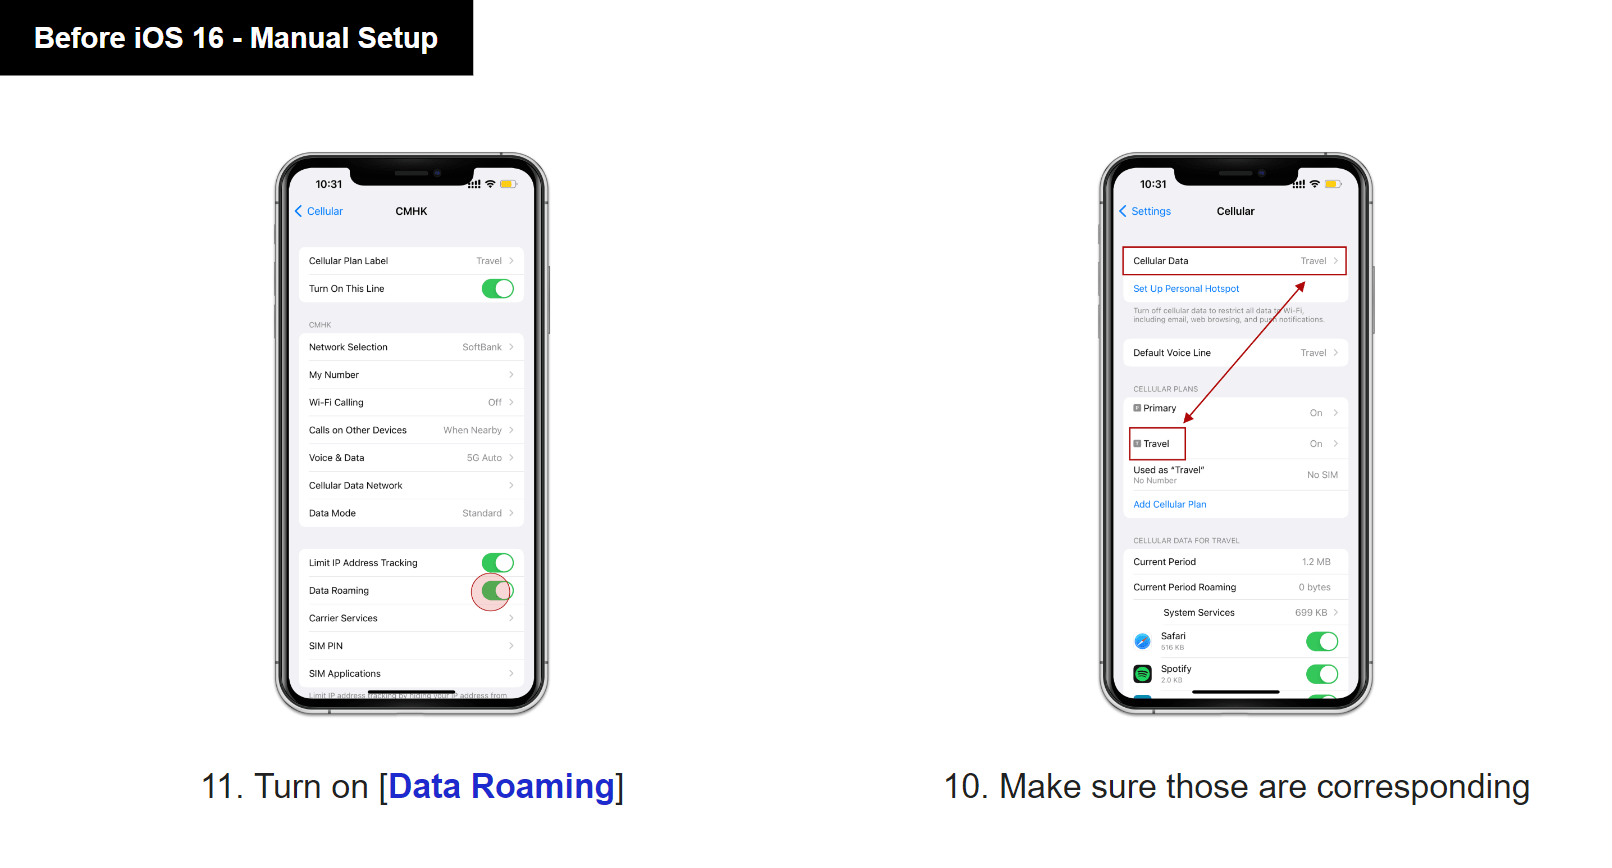
After tapping on “Continue” on the Update Cotracts’ Preferred Line screen, tap the eSIM you just added.
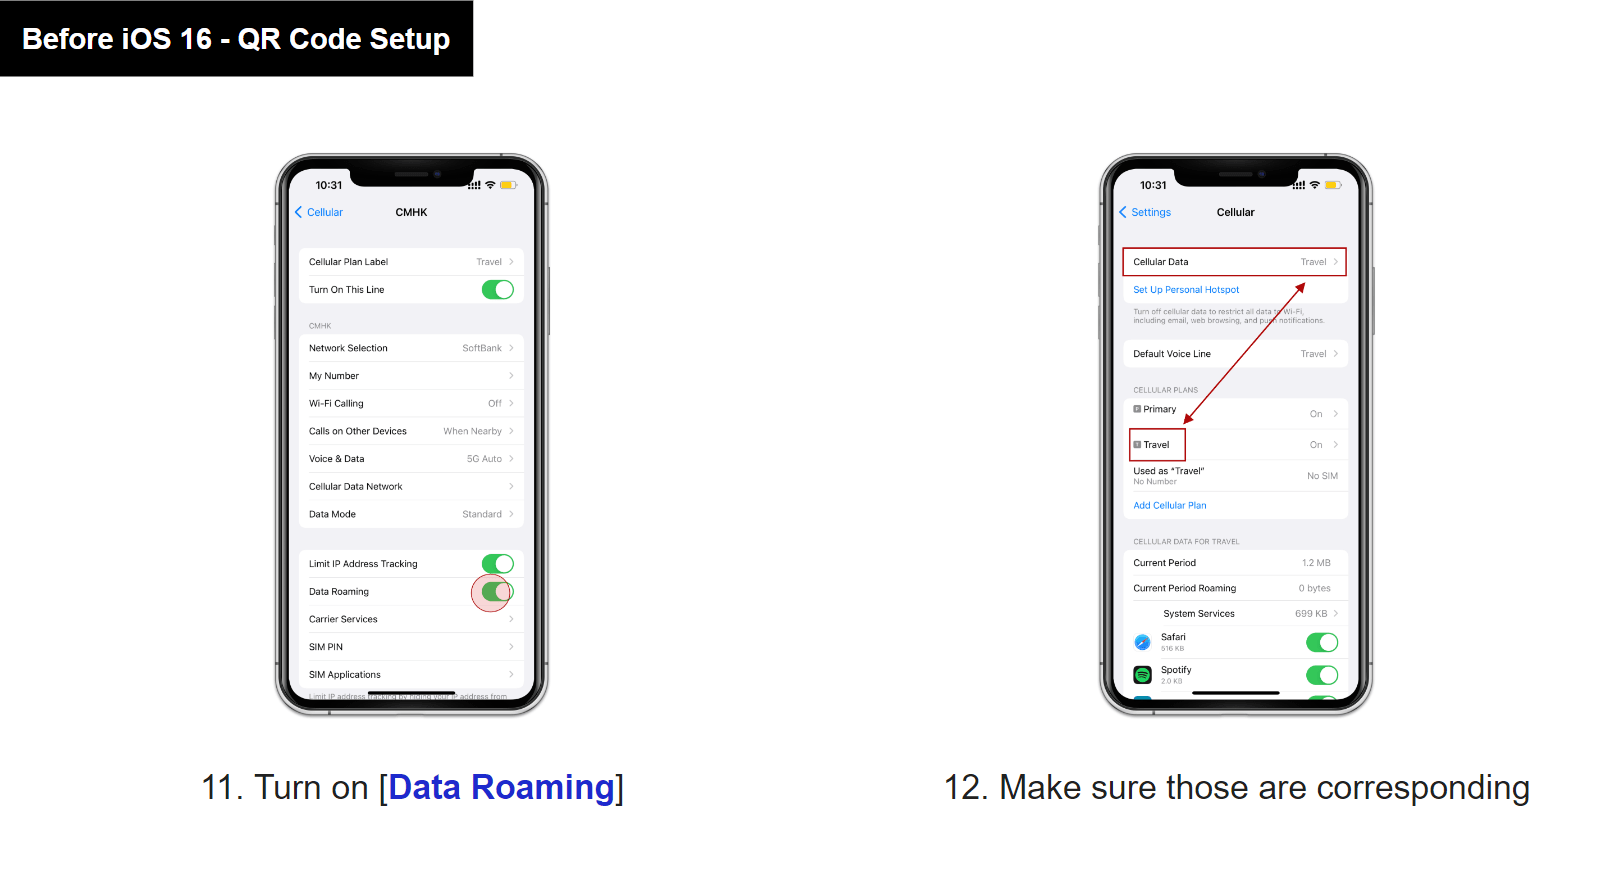
After that, turn on “Data Roaming” and make sure that the Cellular Data and the Cellular Plan correspond (see the top image for reference).
With this, you should be able to use the eSIM you have purchased.
After iOS 16
1. Go to “Settings” on your iPhone
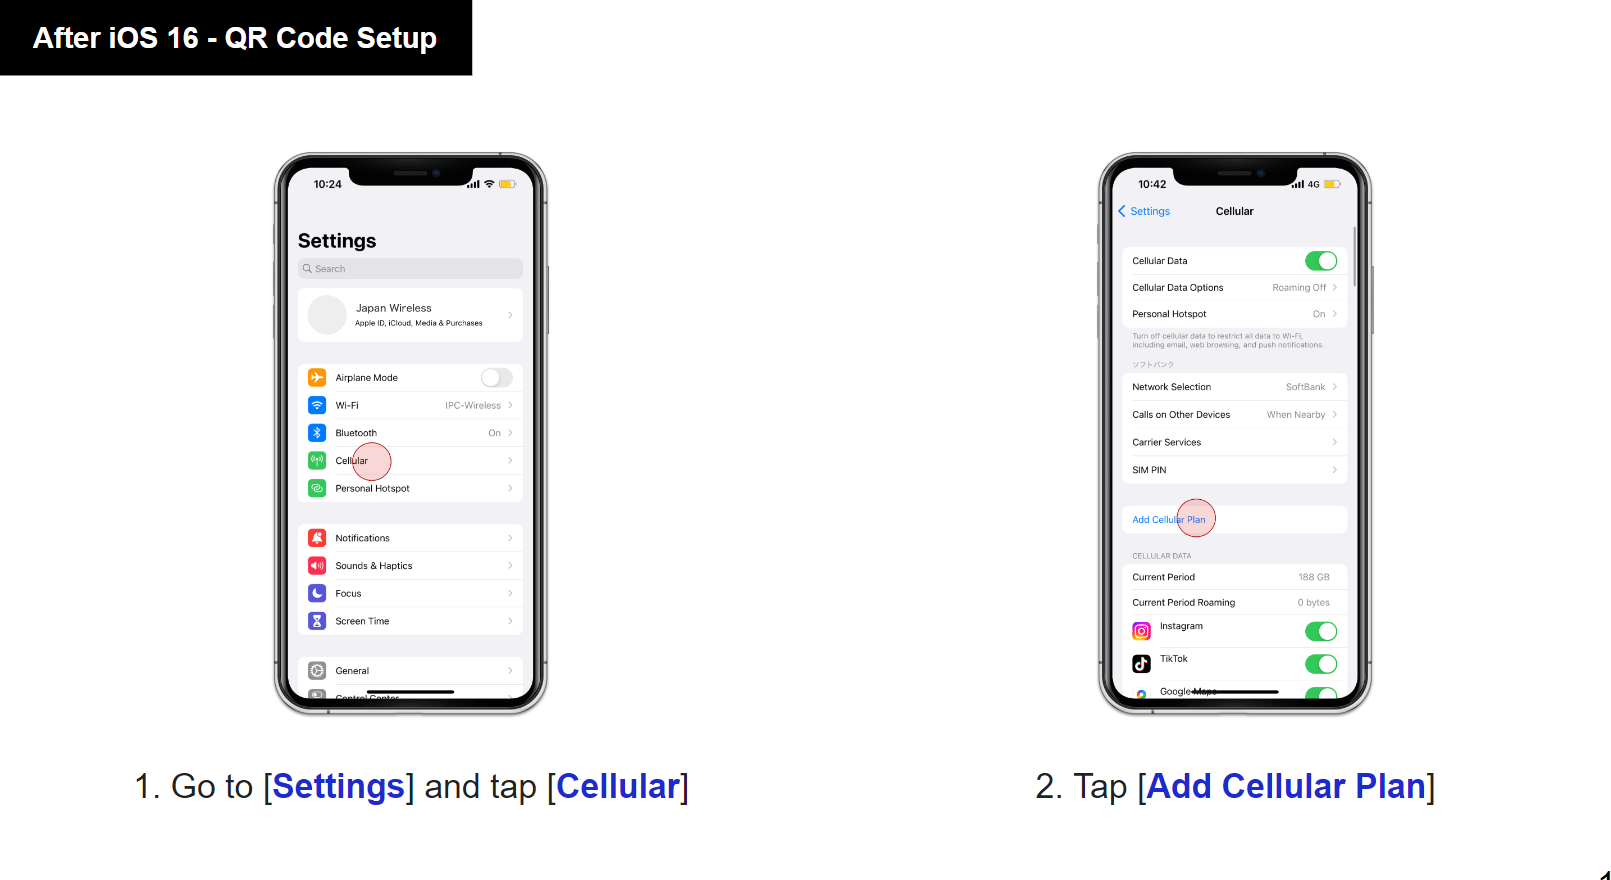
First, go to the Settings screen of your iPhone. From there, tap on “Cellular”. There, tap the “Add Cellular Plan” to go to the Set Up Cellular screen.
2. Scan the QR code
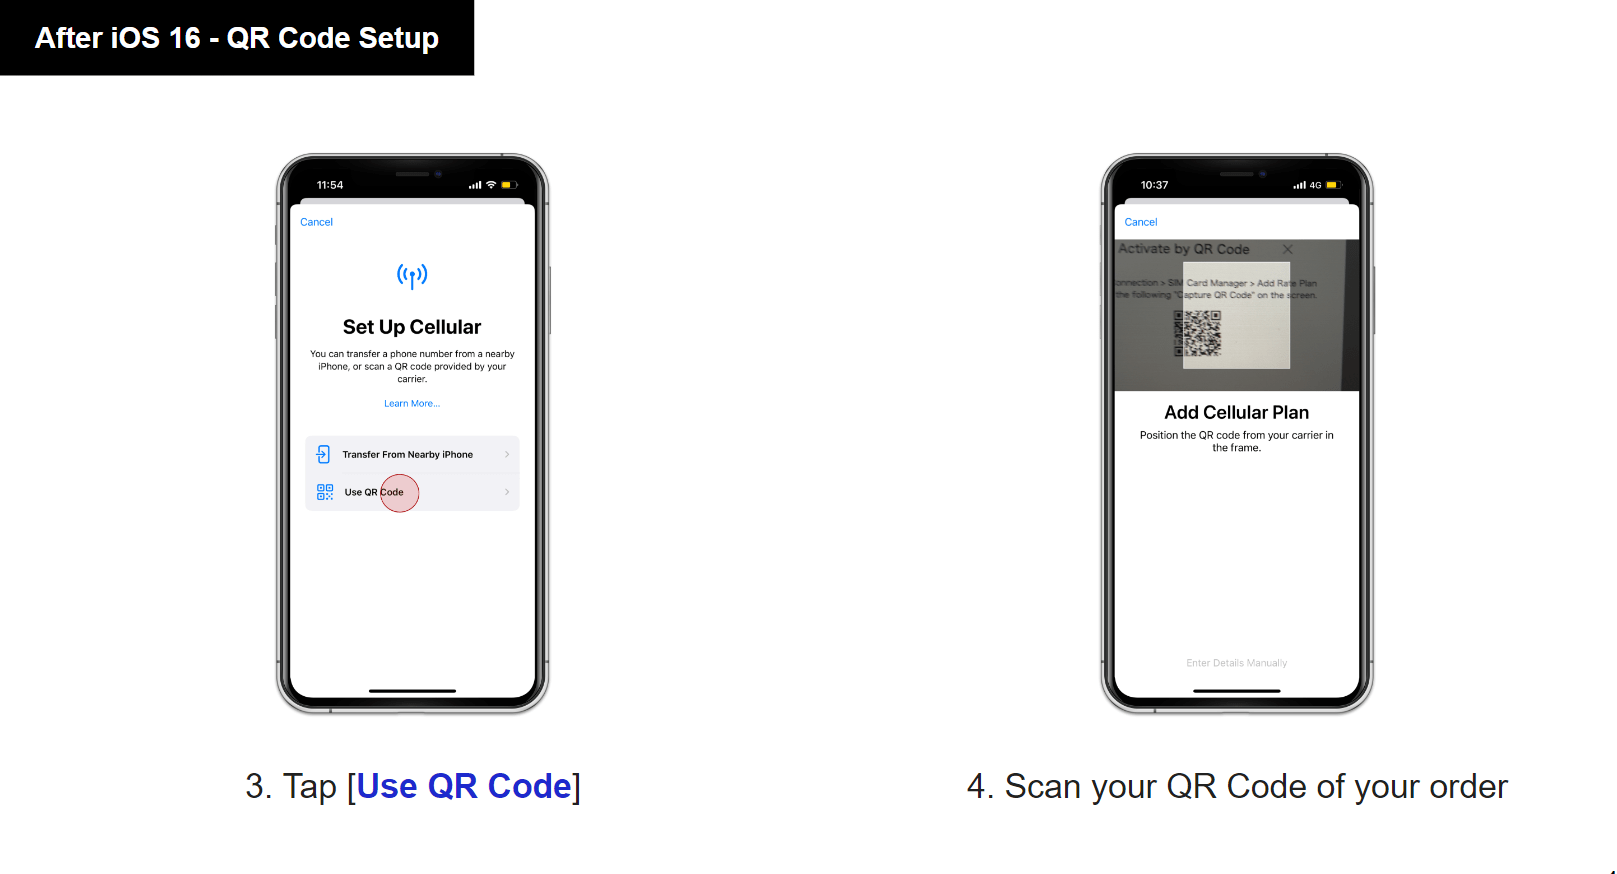
Once you are on the Set Up Cellular screen, tap on “Use QR Code”. Then, you will be taken to the scanning screen. Here, scan the QR code that is provided to you by the eSIM service.
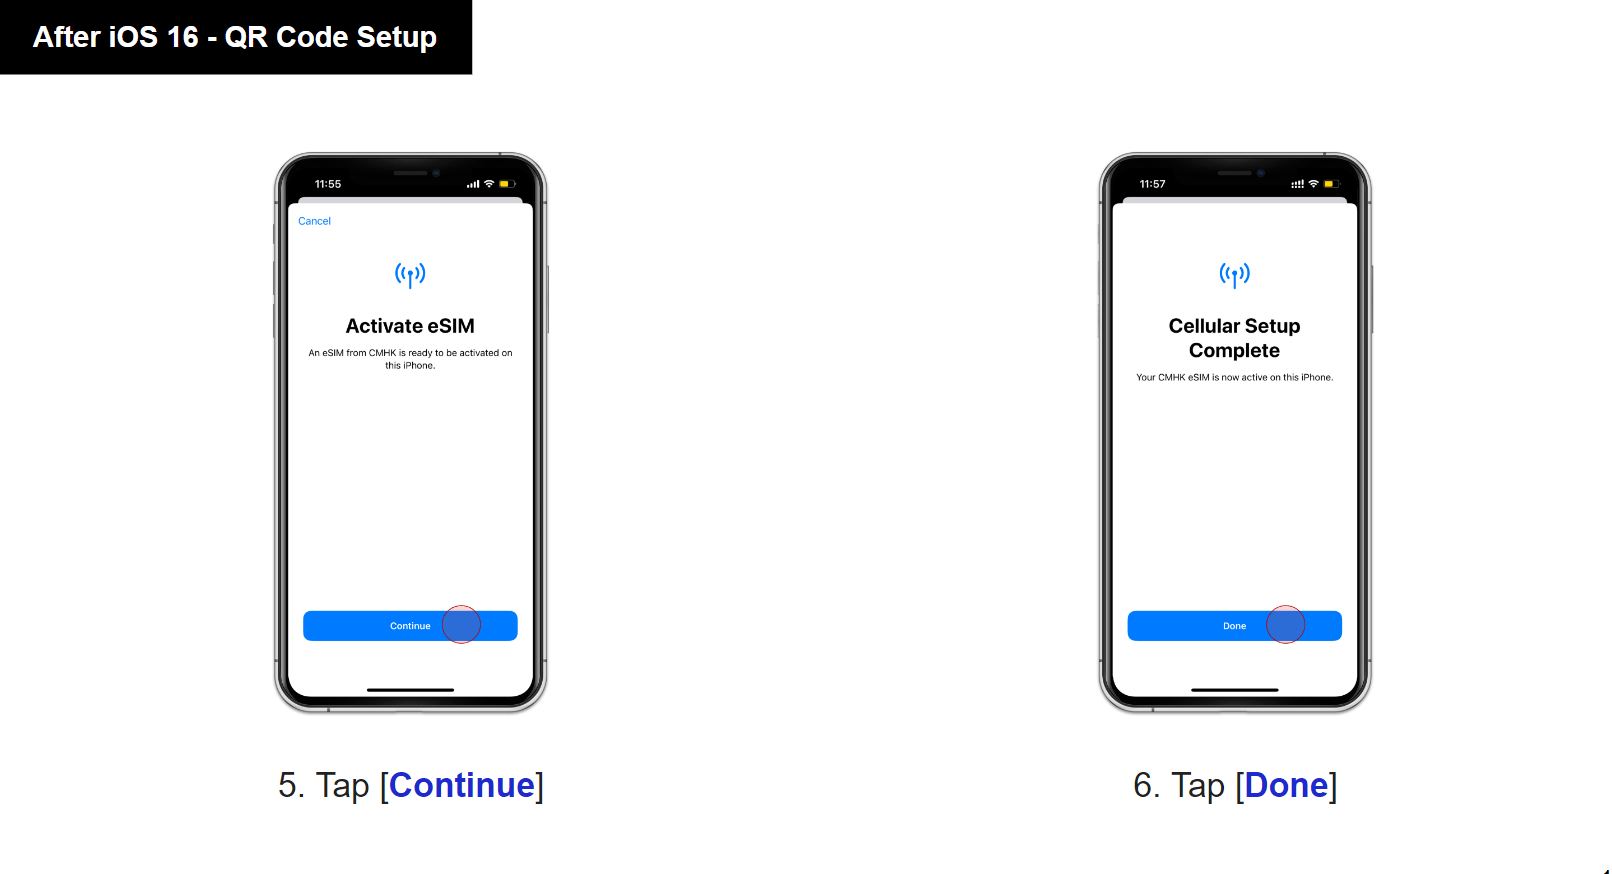
As I previously mentioned, be sure that you have a stable internet connection when installing this eSIM. Once you are ready, then tap on “Continue” and then tap on “Done”. The download process may take a few minutes to complete.
3. Set up Cellular Plan
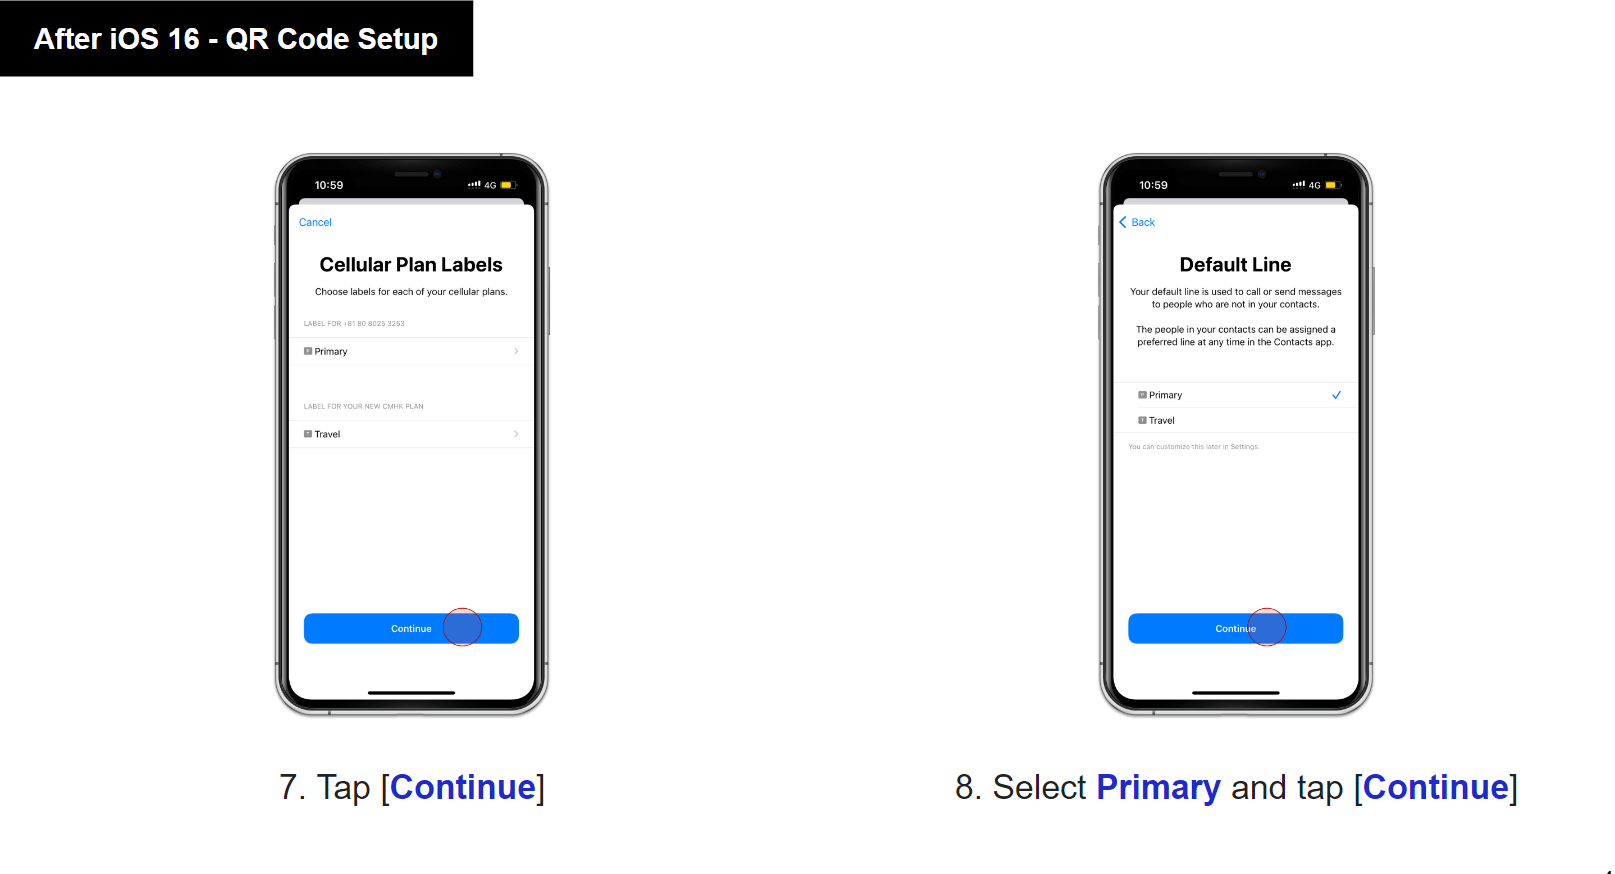
From here, just as in the case with the QR code method, there are a few screens you need to check before using your newly installed eSIM. First, on the Cellular Plan Labels screen, tap “Continue”. Then on the Default Line screen, select “Primary” and then tap on “Continue”.
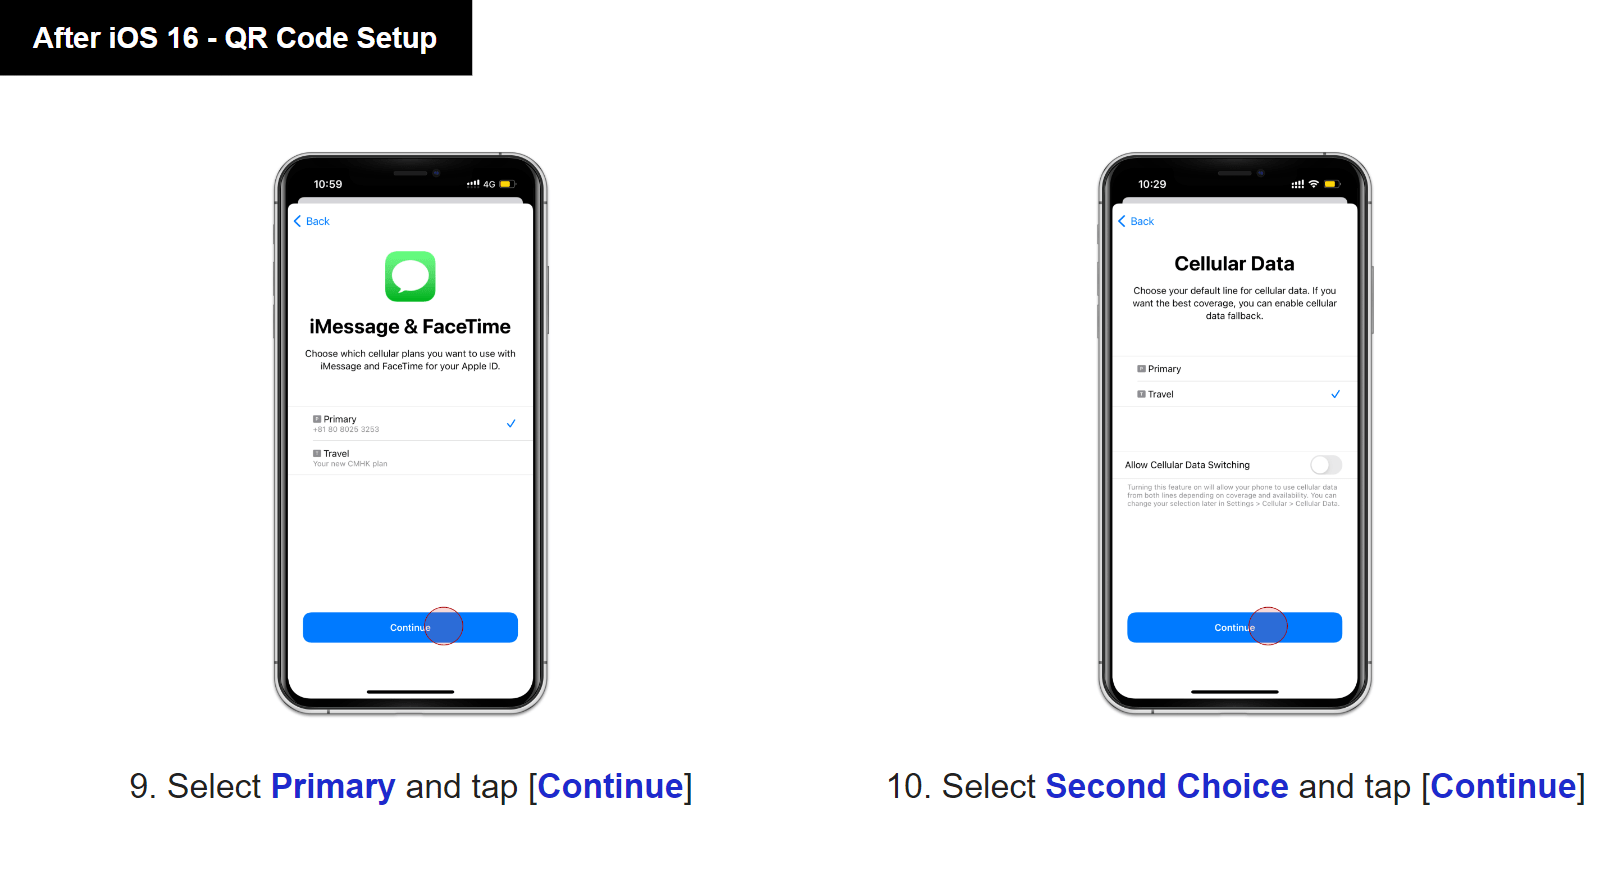
Then, on the iMessage & FaceTime screen, select “Primary” and tap on “Continue”. The next screen that will appear is the Cellular Data screen. Here, select “Second Choice” and tap on “Continue”.
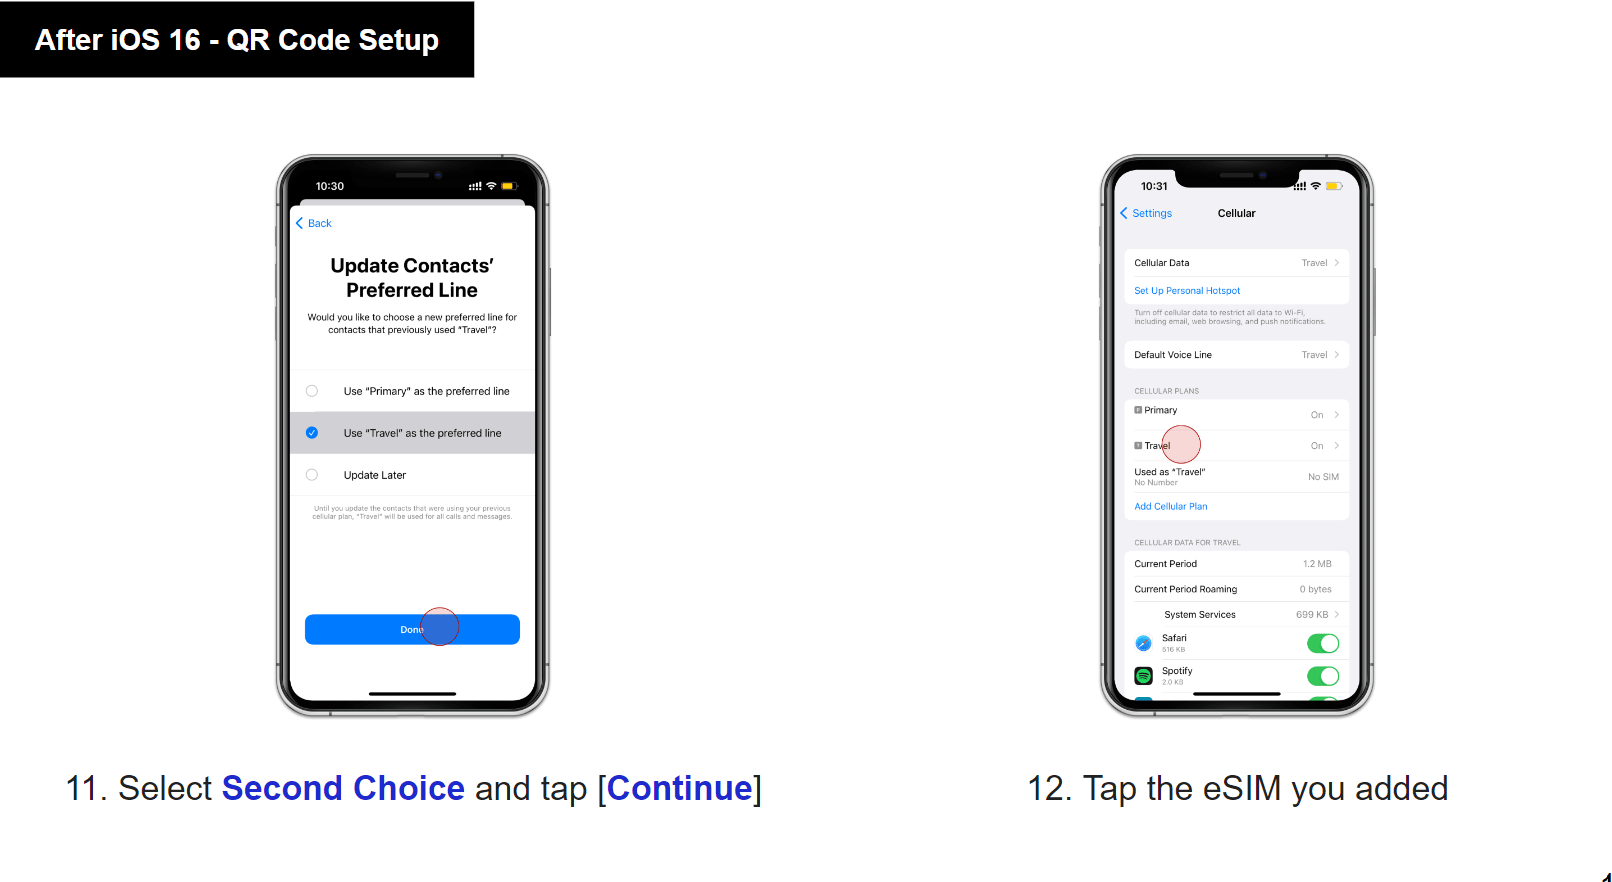
The last of this string of screens is the Update Cotracts’ Preferred Line screen. Here, select “Second Choice” and tap “Continue”.
4. Activate eSIM
After tapping on “Continue” on the Update Cotracts’ Preferred Line screen, tap the eSIM you just added.

After that, turn on “Data Roaming” and make sure that the Cellular Data and the Cellular Plan correspond (see the top image for reference).
With this, you should be able to use the eSIM you have purchased.
Method 2: Manual Setup
Here are the instructions for setting up your eSIM to your iPhone manually. The manual setup is the same for iOS before and after iOS 16.
1. Go to “Settings” on your iPhone
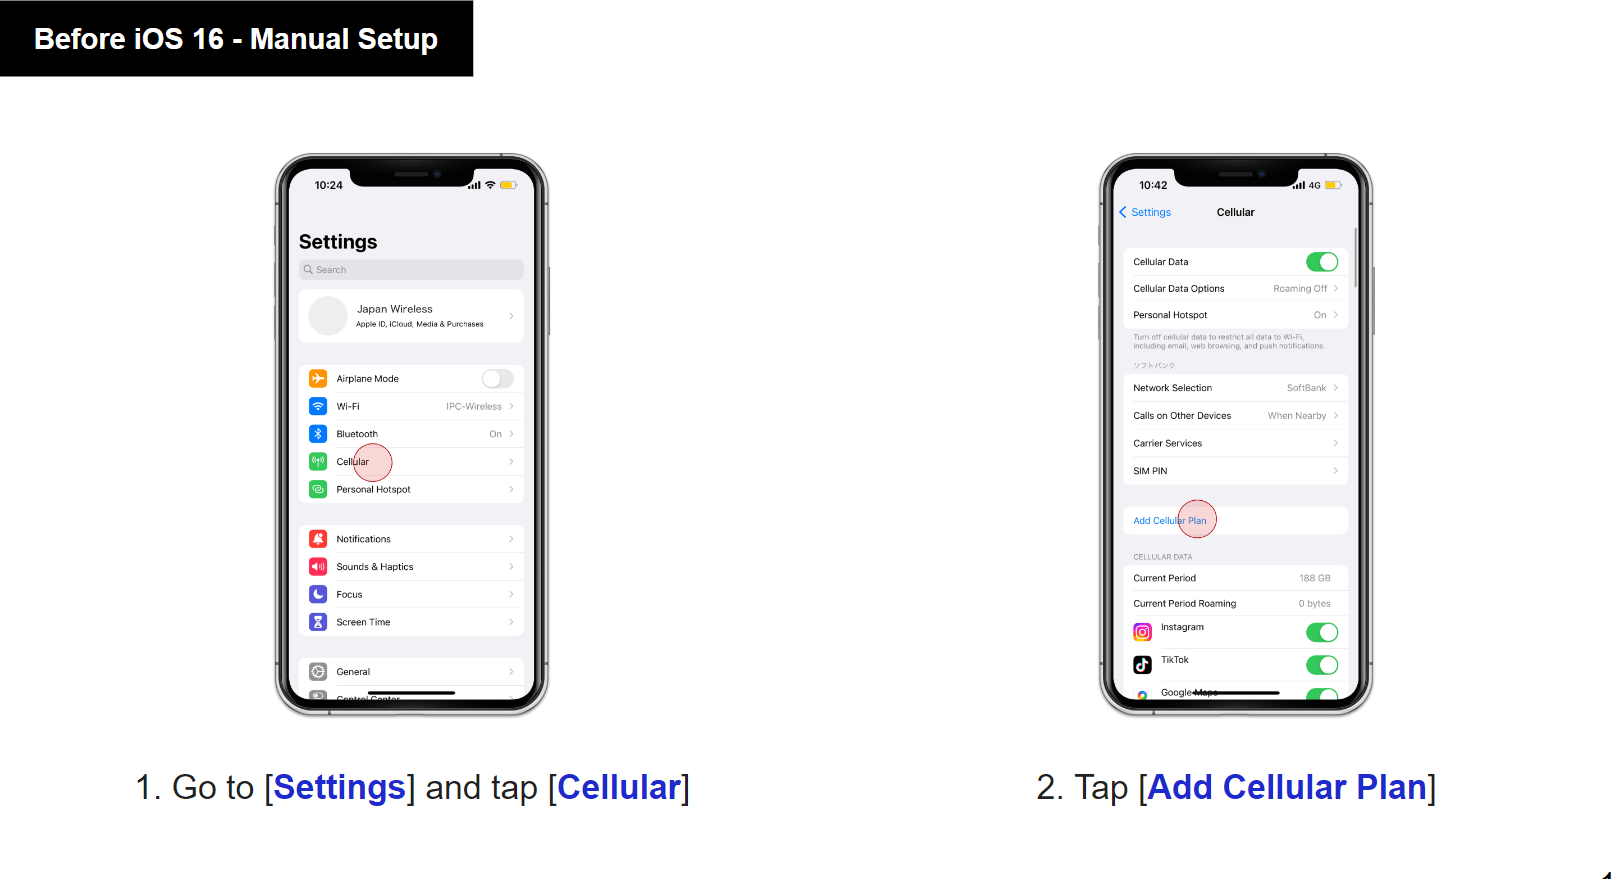
First, go the Settings screen of your iPhone. From there, tap on “Cellular”. There, tap the “Add Cellular Plan” to go to the scanning screen.
2. Enter the Activation Code Manually
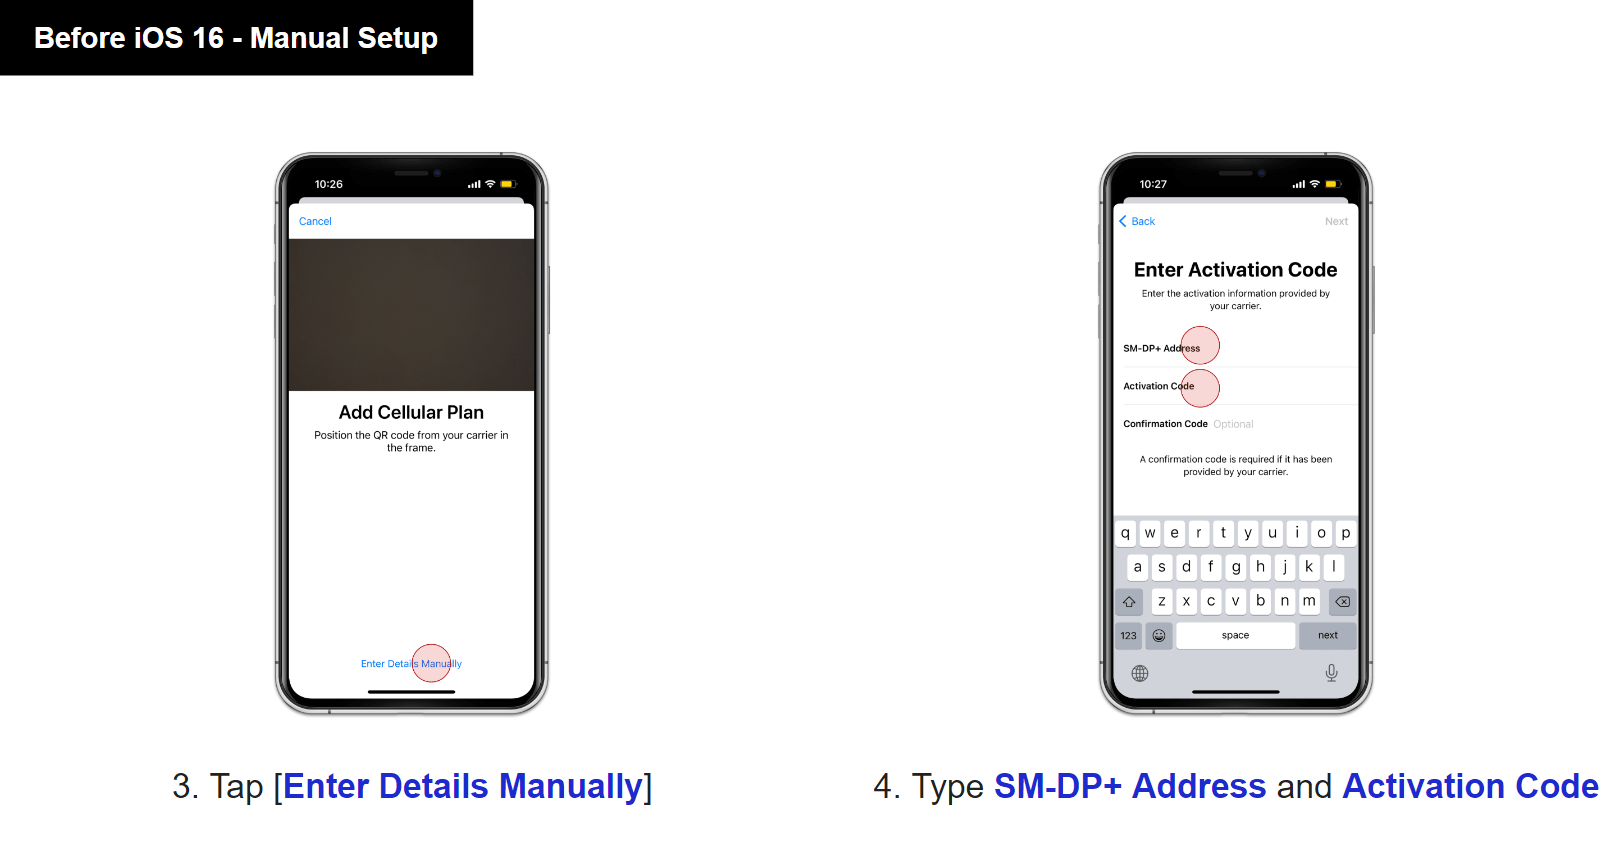
Once you are at the scanning screen, instead of scanning the QR code, tap on “Enter Details Manually”. This will take you to the Enter Activation Code screen. Here, type SM-DP+ Address and Activation Code.
3. Set up Cellular Plan
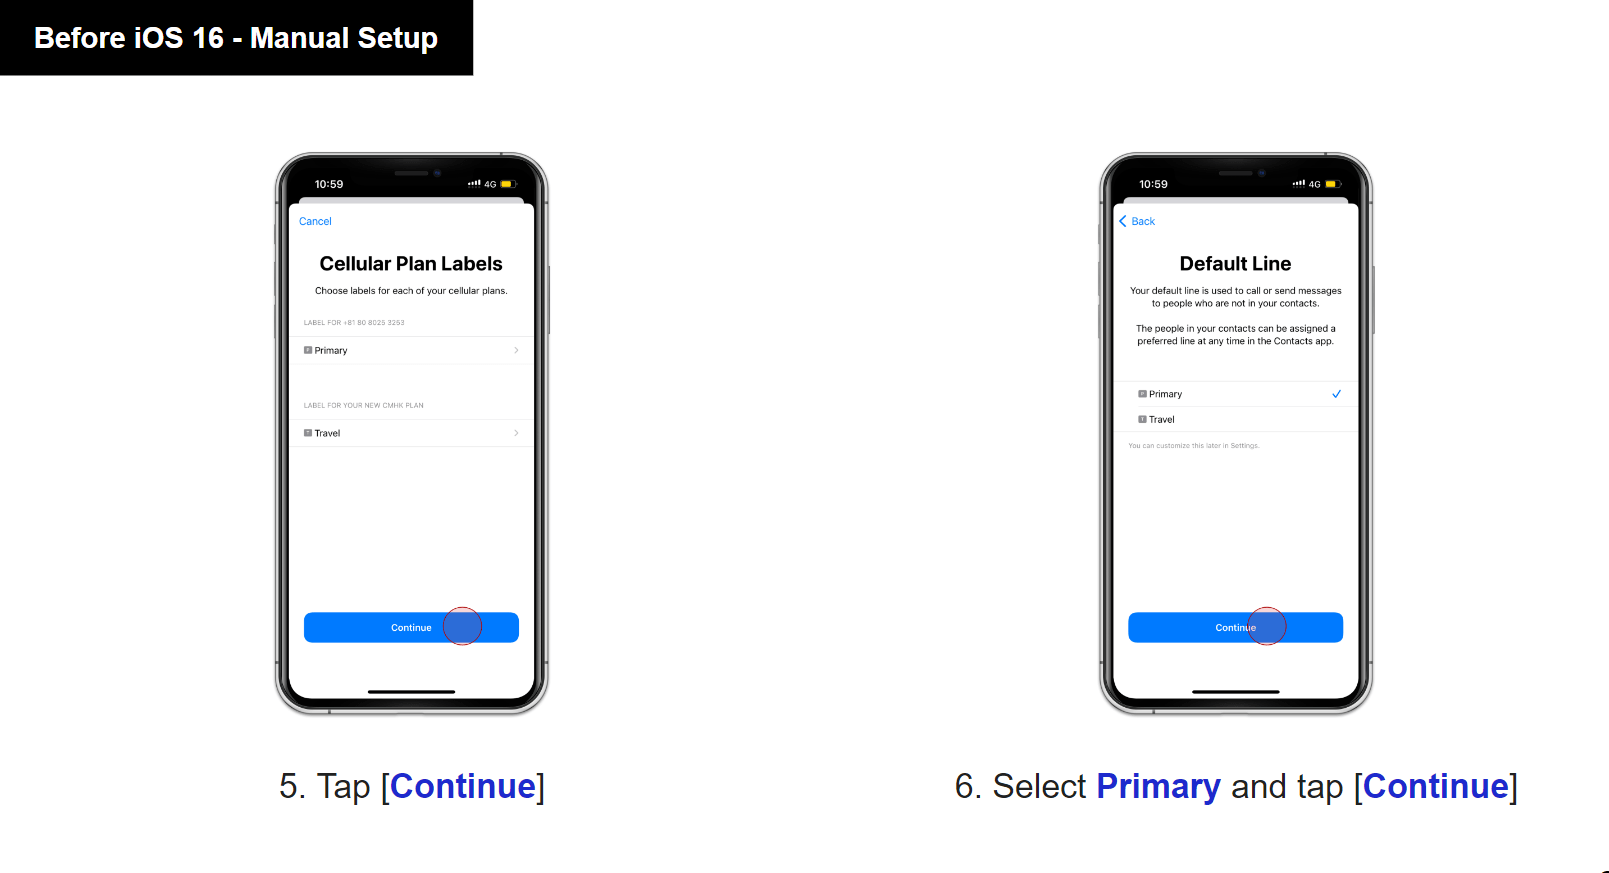
From here, there are a few screens you need to check before using your newly installed eSIM. First, on the Cellular Plan Labels screen, tap “Continue”. Then on the Default Line screen, select “Primary” and then tap on “Continue”.
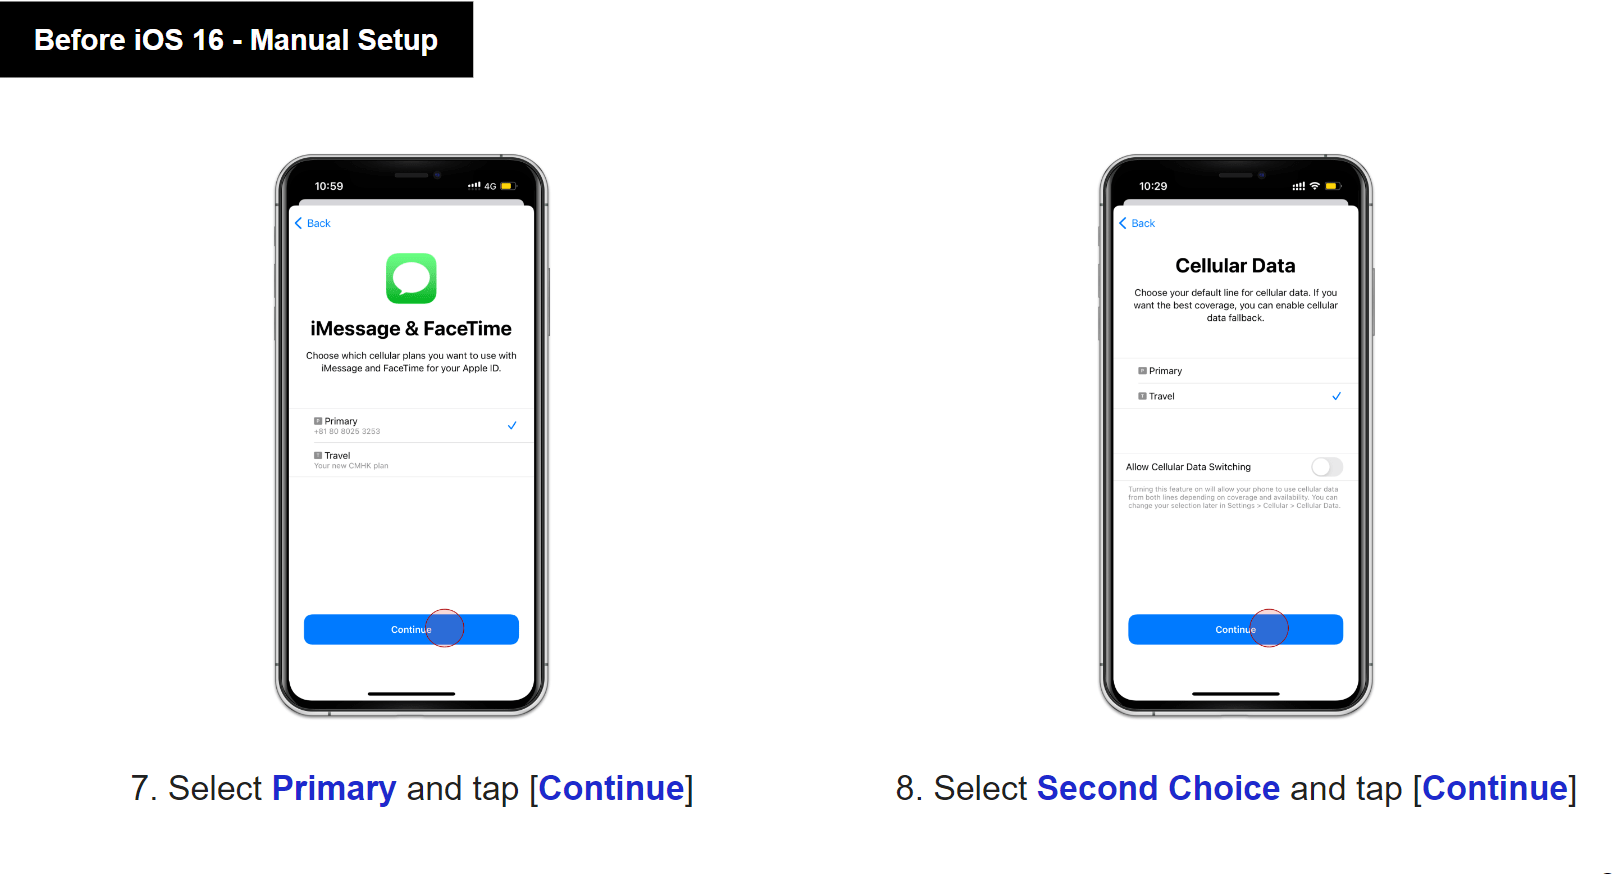
Then, on the iMessage & FaceTime screen, select “Primary” and tap on “Continue”. The next screen that will appear is the Cellular Data screen. Here, select “Second Choice” and tap on “Continue”.
The last of this string of screens is the Update Cotracts’ Preferred Line screen. Here, select “Second Choice” and tap “Continue”.
4. Activate eSIM
After tapping on “Continue” on the Update Cotracts’ Preferred Line screen, tap the eSIM you just added.
After that, turn on “Data Roaming” and make sure that the Cellular Data and the Cellular Plan correspond(see the top image for reference).
With this, you should be able to use the eSIM you have purchased.
I hope this article helps in case you need to install an eSIM on your iPhone. As I previously mentioned, eSIM will become more and more common from now on, so if you are a frequent traveler, you may need to install this on numerous occasions.
▽Subscribe to our free news magazine!▽
For more information about shopping in Japan, check these articles below, too!

▽Related Articles▽


▼Editor’s Picks▼


Written by
Born and raised in Costa Rica, I started living in Tokyo from college. I love traveling within Japan & around the world. Since I wasn’t born in Japan, I know the cultural impact that you can get when visiting Japan for the first time and what you might be worried about before your trip. And I’ve lived long enough to somewhat understand the nuances of the Japanese culture that make this country such an attractive place to visit. Hopefully I can provide to you both the information you’re looking for and the information you didn’t know you needed to know.
- +0 32
-
-