Nuro Hikari: How to Subscribe Online
Step by step indications to get Nuro Hikari service online
If you are thinking of subscribing to Nuro Hikari internet service, but don’t know how to because everything on the website is in Japanese, then this is the page for you.
Having a smooth internet connection has become one of the essential necessities in life. If you’re planning on moving to a new house or apartment in Japan, then making sure that you have a good internet connection should be one of your priorities.
You may already know this, but Nuro Hikari is one of the most popular internet services in Japan right now.
In this article, I will show you how to subscribe to the internet service Nuro Hikari. The subscription process will be all in Japanese, so I will guide you step by step while translating everything displayed during the process.
*Please note that this article contains affiliate links.
What is Nuro Hikari?
As I stated in the intro of this article, Nuro Hikari is one of the most popular internet services you can find in Japan.
It is an internet service provided by SONY that provides internet via fiber-optic broadband, which means it is a steady, high-speed internet service (up to 2Gbps for downloading). If you pay a little extra, it offers even higher speeds as much as 10Gbps or even 20Gbps.
If your apartment or house happens to already have a Hikari internet line, then it will not be necessary to install the fiber-optic broadband. But in most cases, this installation will be necessary. The installation cost is 44,000 yen for both apartments and houses. Depending on the plan of payment, this cost will not be charged (although there will be a 3,300 yen handling charge).
Nuro offers a rental service of pocket wifi so that you can have internet service while you wait for the day of your installation.
The monthly internet cost is either 5,200 yen(3-year plan) or 5,700 yen(2-year plan), but this can vary using various types of discounts. For example, Softbank Mobile users get a discount if they also use Nuro’s fixed phone as well as the internet service.
How to Subscribe online
From here, I will explain how you can subscribe to Nuro Hikari online. You could also subscribe by going directly to a Nuro Hikari service counter in any Nojima Shop(ノジマ), however, it is not guaranteed that there will be an English-speaking staff around. So if you decide to go to a Nojima shop, it might be a good idea to take a Japanese-speaking friend along with you.
*Note: I will explain using the display of the PC. So if you are going to subscribe from your mobile phone, the display will be different.
1. Go to the Nuro Hikari website
Here’s the link that will take you to the Nuro Hikari main website.
▶ Subscribe to Nuro Hikari online here
When you open this link, it should take you to the site as shown below (the main image might change with time).
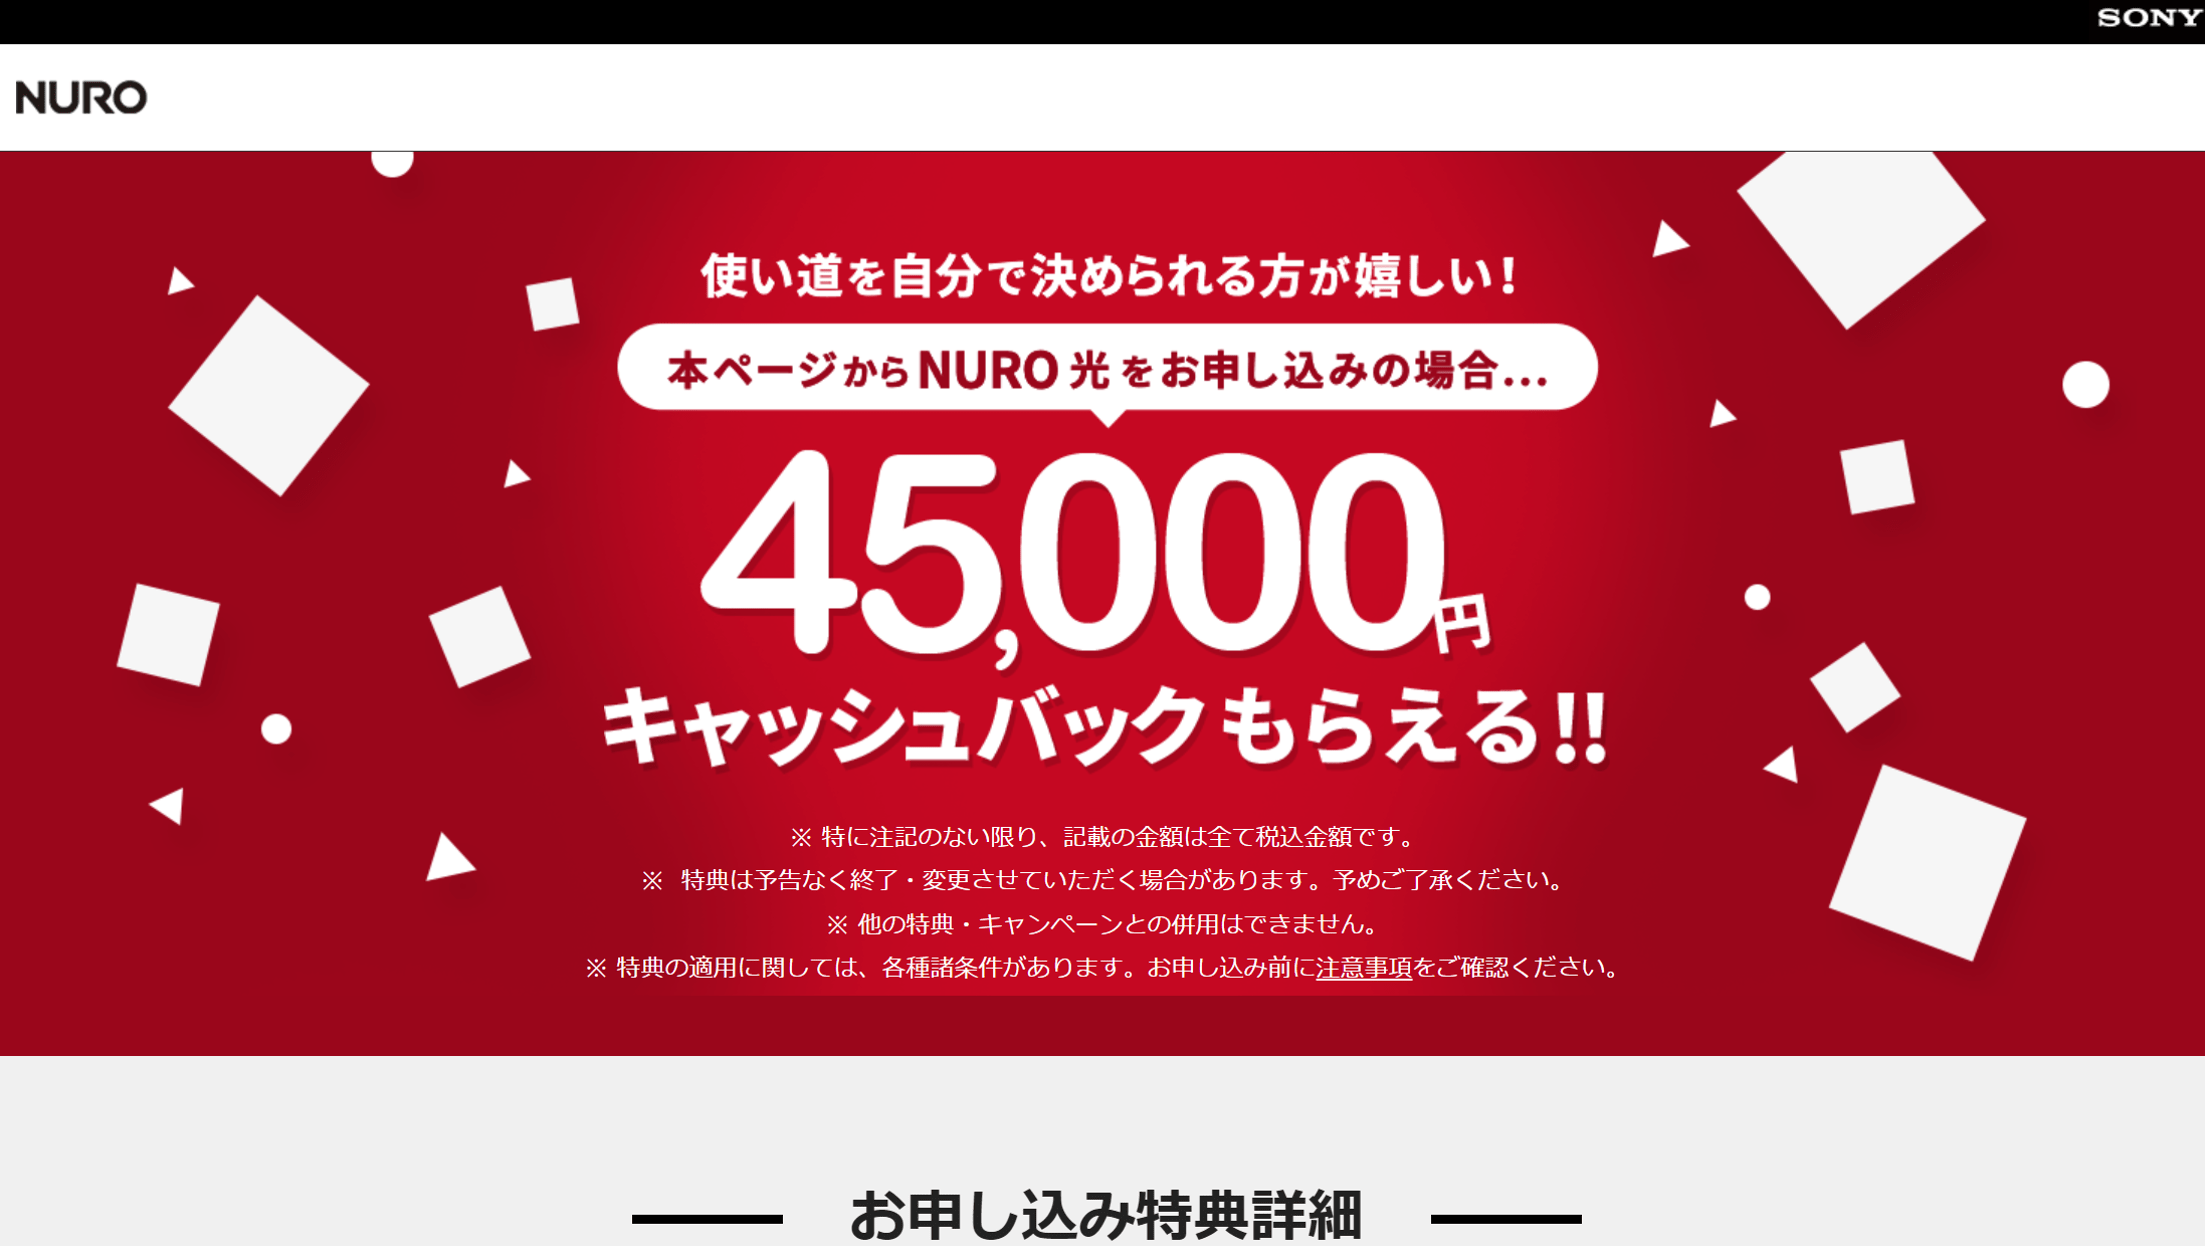
When you get to this page, scroll down a little until you see the following image.
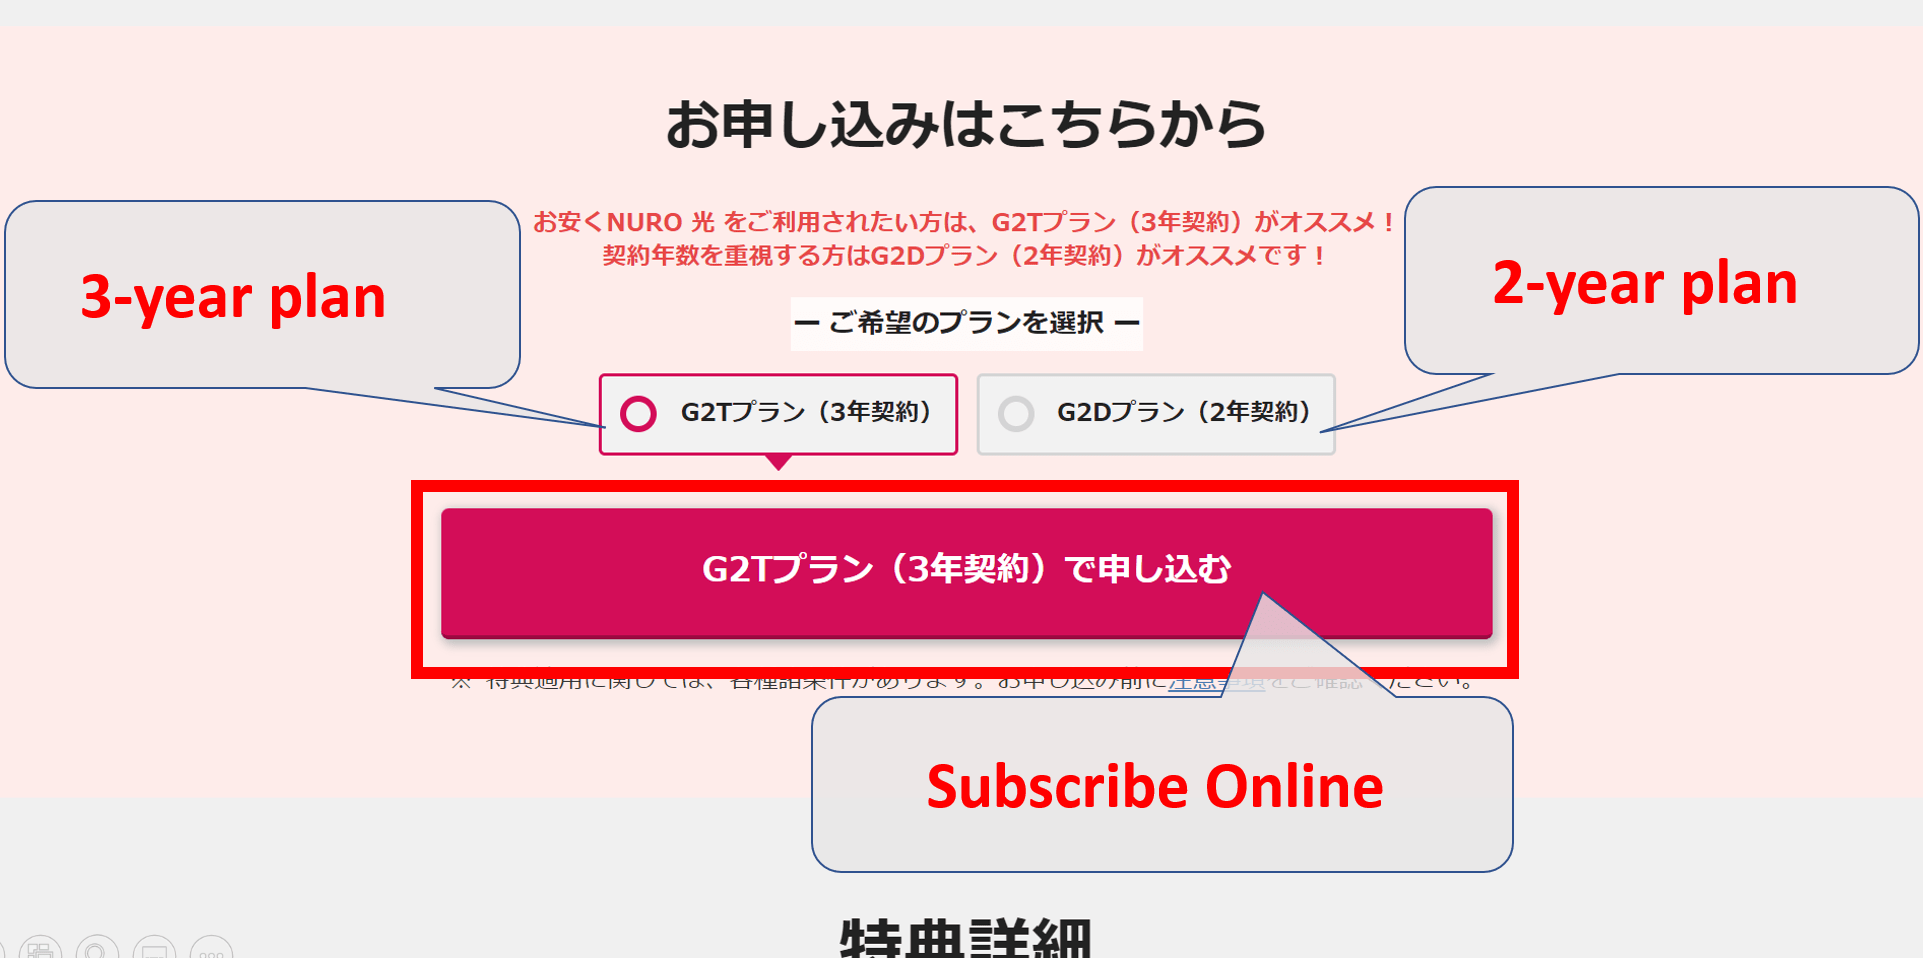
Choose between the 3-year plan(left button) and the 2-year plan(right button) before you click on the big red button to proceed.
If you choose the 3-year plan, the monthly payment will be 5,200 yen and if you complete the 3 years, then the initial installation cost(44,000 yen) will not be necessary.
On the other hand, if you choose the 2-year plan, the monthly payment will be 5,700 yen. The installation cost will also not be necessary if you complete the 2 years.
After you have clicked on the red button to proceed, you will arrive at the page where you need to fill in your address.
2. Filling in your address
After you have clicked on the red button to proceed, you will arrive at the page where you need to fill in your address. It should look like the image below.
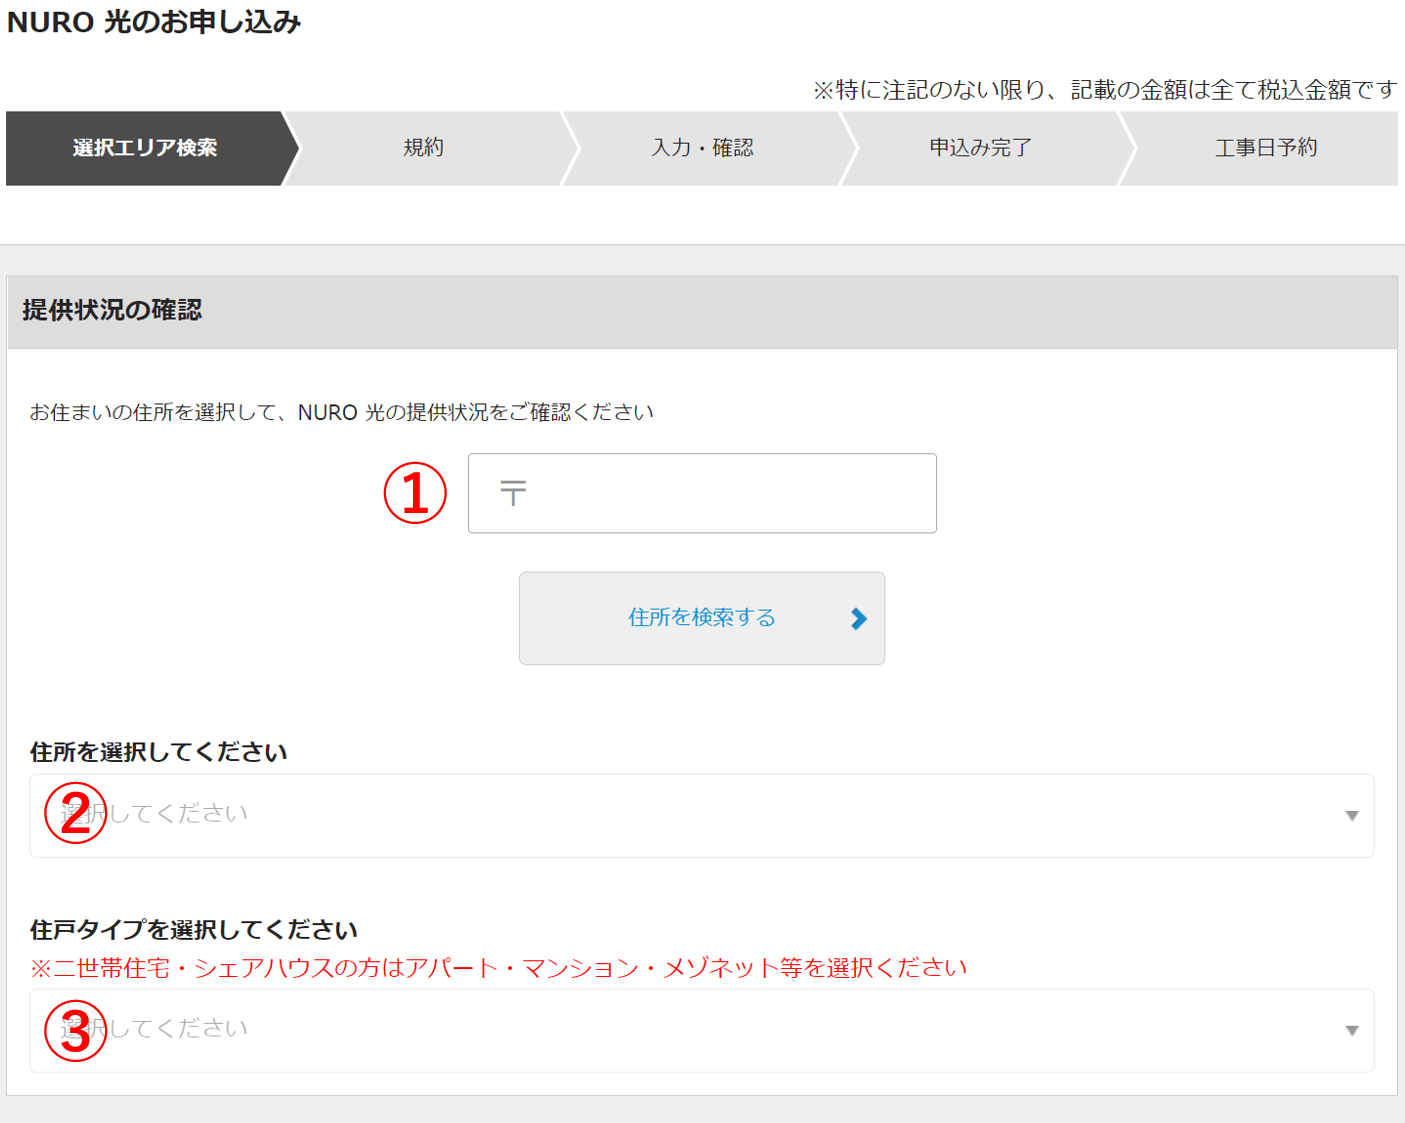
Answer the questions shown above as follows.
①Postal code: Type in your postal code. It should be a 7 digit number. After you type your postal code, click on the button right beneath. it will proceed to provide a few choices of your address in the next part.
②Street number: Choose the street number from the provided choices.
③Type of building: When you click on this box, 2 choices will appear as the following picture.
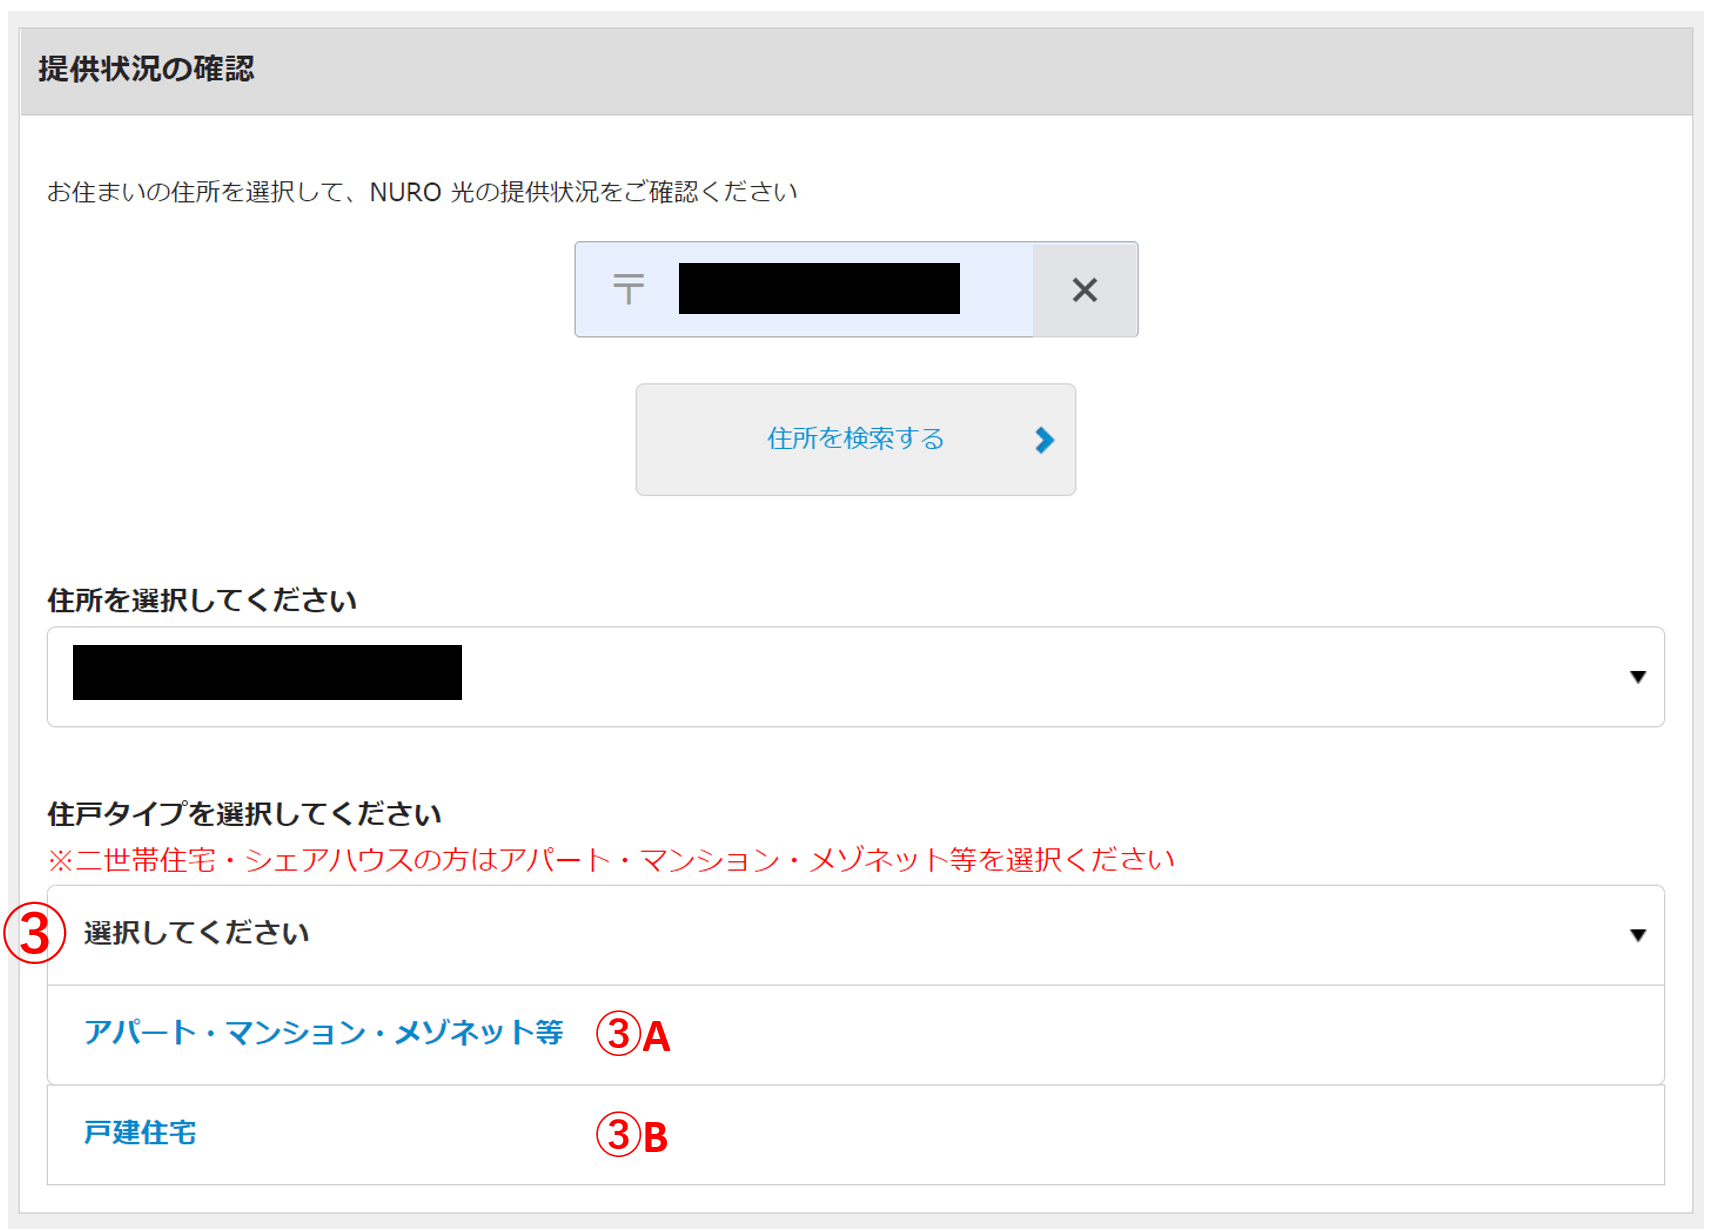
If you live in an apartment building, then choose “③A”. If you live in a house, then choose “③B”.
After answering ③, scroll down to point ④.
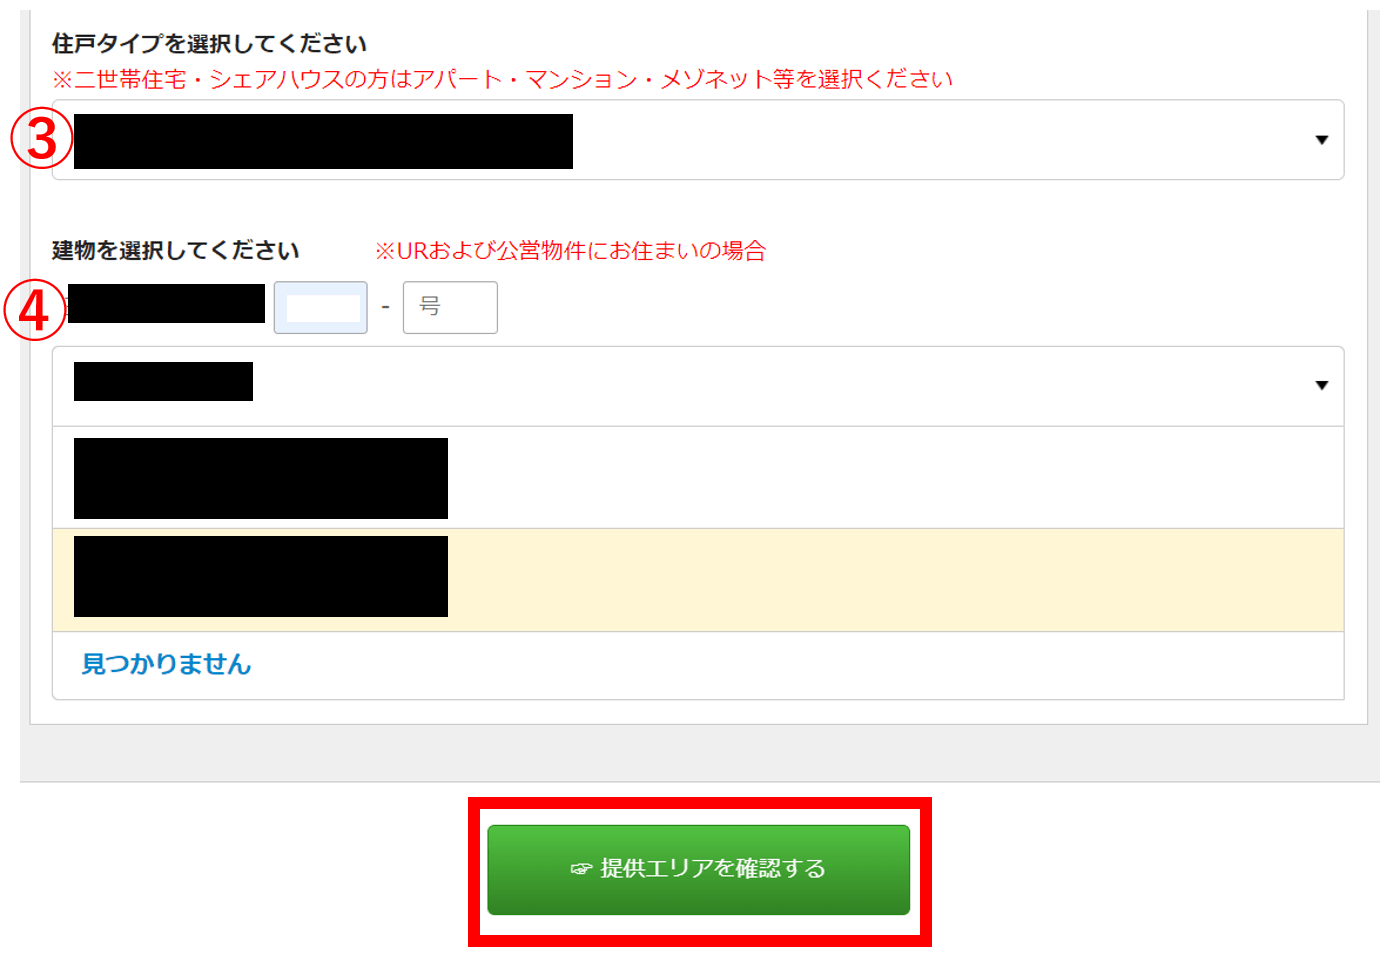
④Rest of address: Proceed filling in the rest of your address. Once you do this, a few options will appear where you can choose the apartment name(in the case that you do live in an apartment). If your apartment name dowsn’t appear, choose the last option which sais 「見つかりません」(it means “does not appear”).
Then proceed to the next part by clicking on the big green button. It will take you to the address confirmation page just as it is shown below.
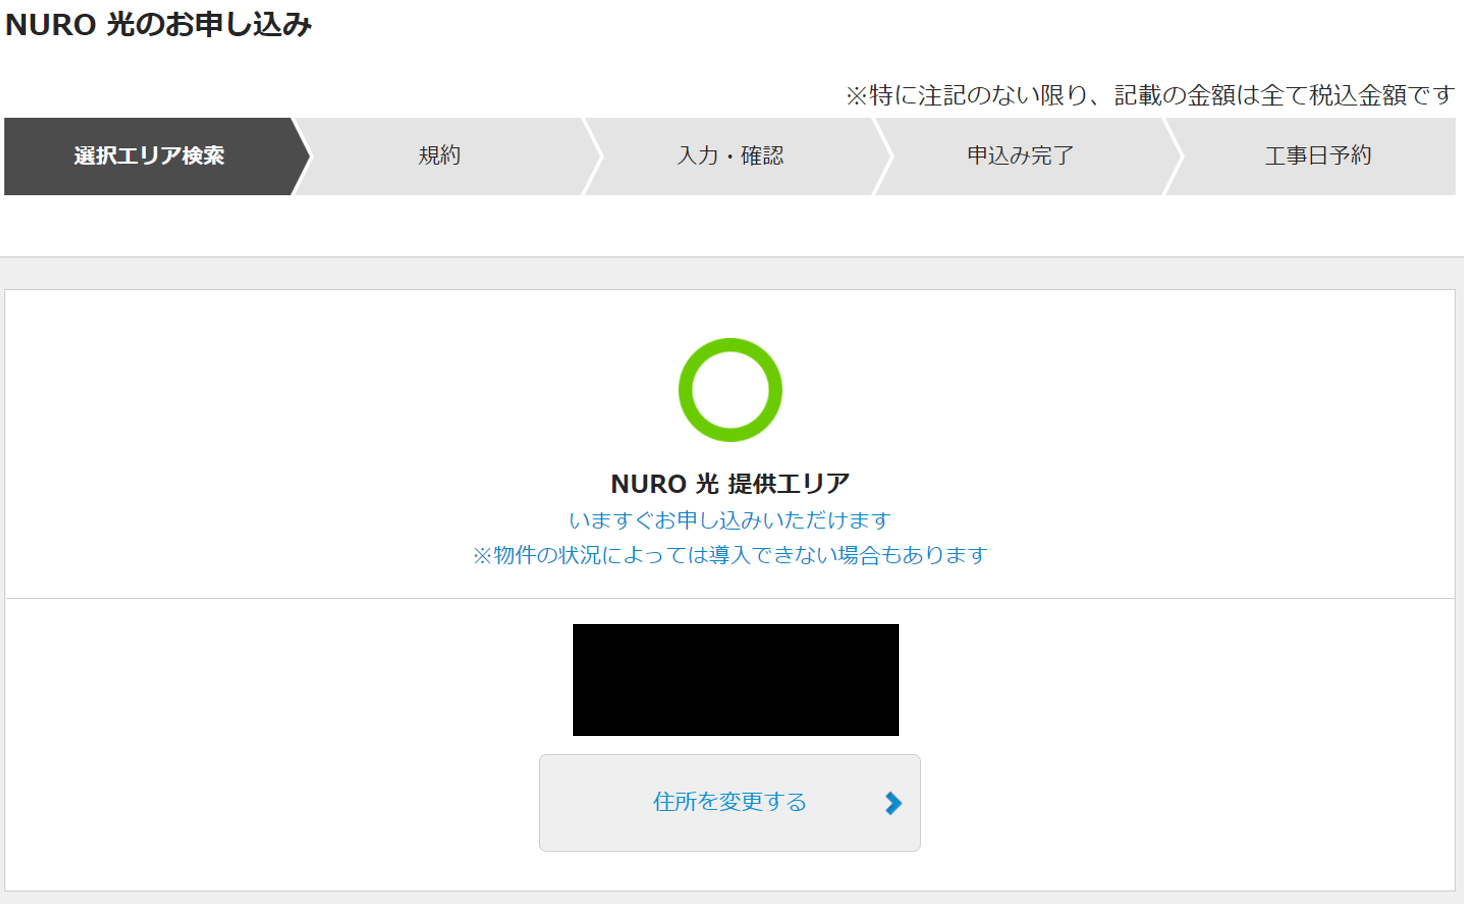
If you see the green circle as it is shown in the image above, this means that the address that you have provided is apt for installation.
*In the case that it is not apt, unfortunately, it means this service can not be provided to the apartment or house where you live in.
After checking this point and you scroll down, you will see many boxes you can check. these are additional services and discounts that may or may not apply to you. Explaining this part will require a whole other article. So, I will skip this part since it is not essential in order to subscribe to the internet service.
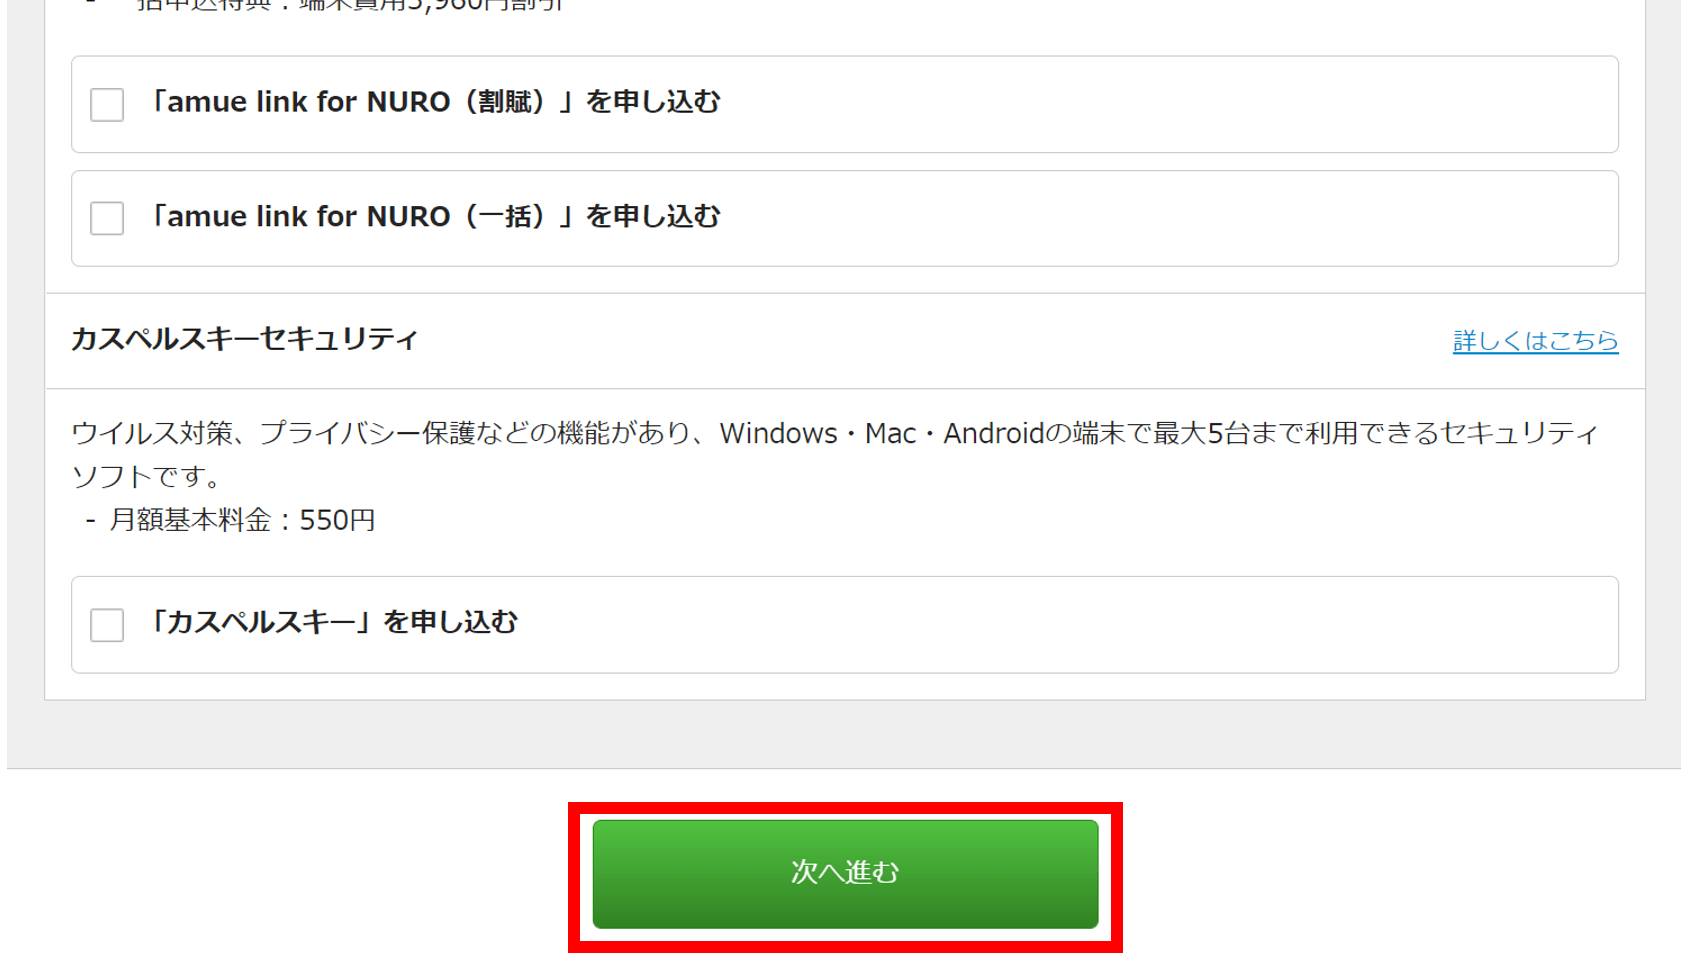
So here, you can scroll all the way down until you see the big green button. Click it to proceed.
3. Terms and conditions
After clicking on the green button, you will be taken to the “Terms and Conditions” page.
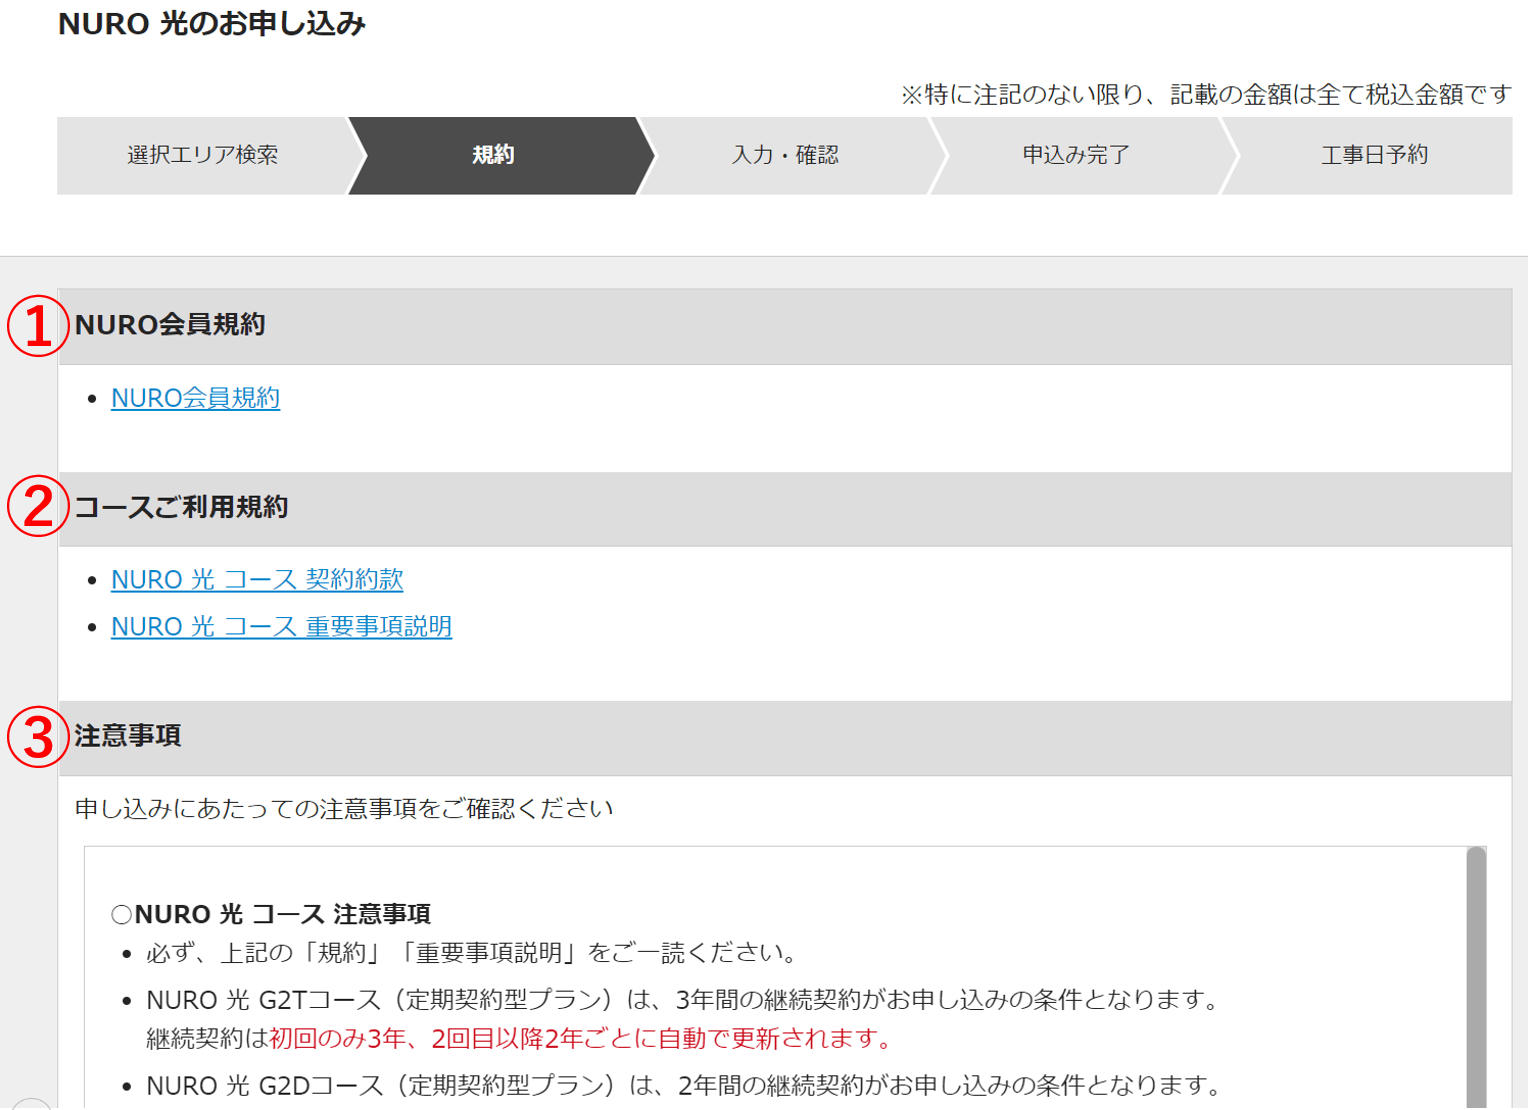
①Terms and Conditions about Nuro: Click to check the “Terms and Conditions” (in Japanese).
②Contract terms about Nuro Hikari: Click to check the “Contract terms” (in Japanese).
③Important Points
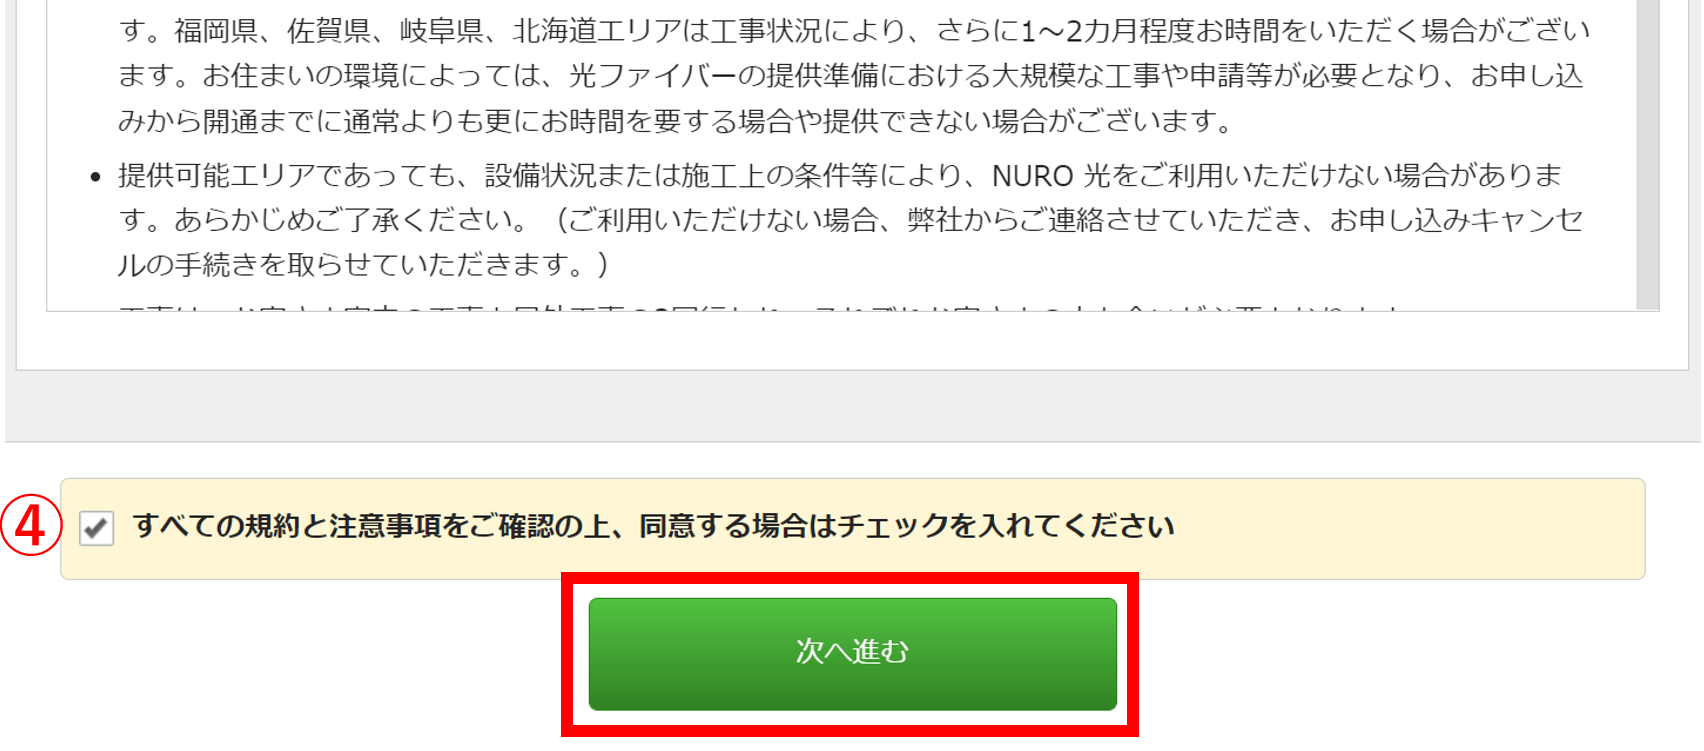
④Check the box if you agree with the previous points indicated in ①, ②, and ③.
Then click on the green button to proceed to the “Confirmation page”.
4. Filling in your personal information
After clicking on the green button, you will get to the confirmation page as shown below. You will come back to this page a couple of times to check that the information you have provided is correct.
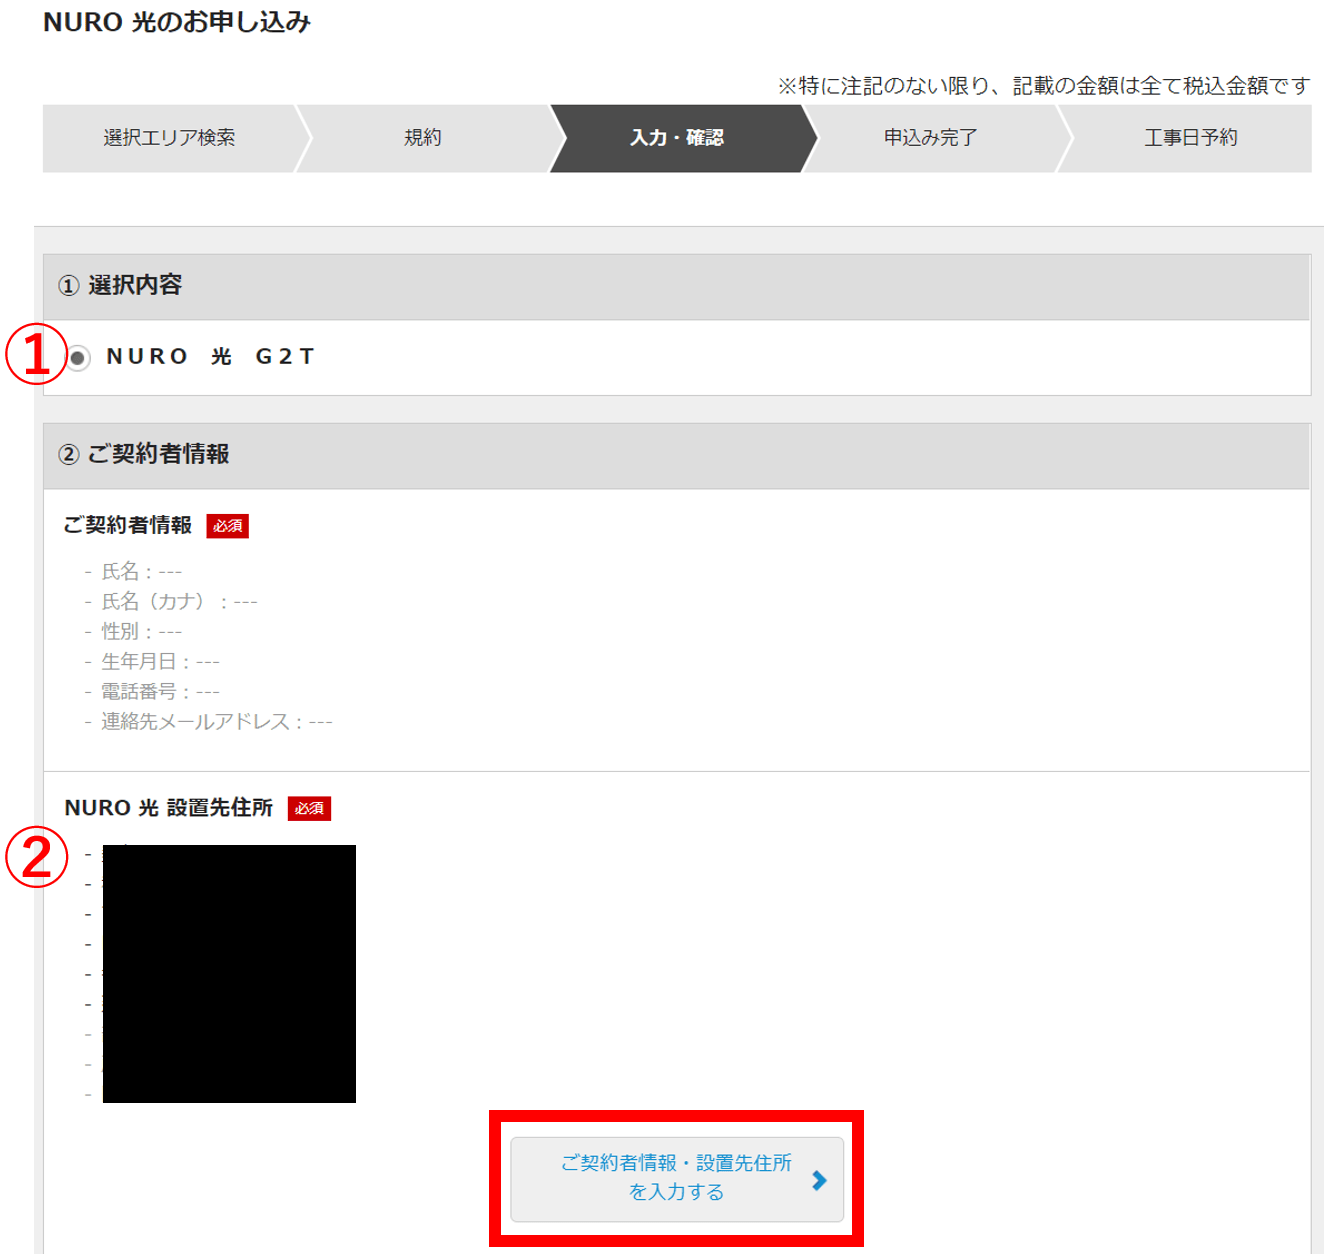
Check the following info.
①Service Plan: If you chose the 3-year plan, it should say “G2T”. If you chose the 2-year plan, it should say “G2D”.
②Adress: The info will be in Japanese.
If there’s no mistake, click on the button surrounded in red shown above. It will take you to the next page where you need to fill in your personal information.
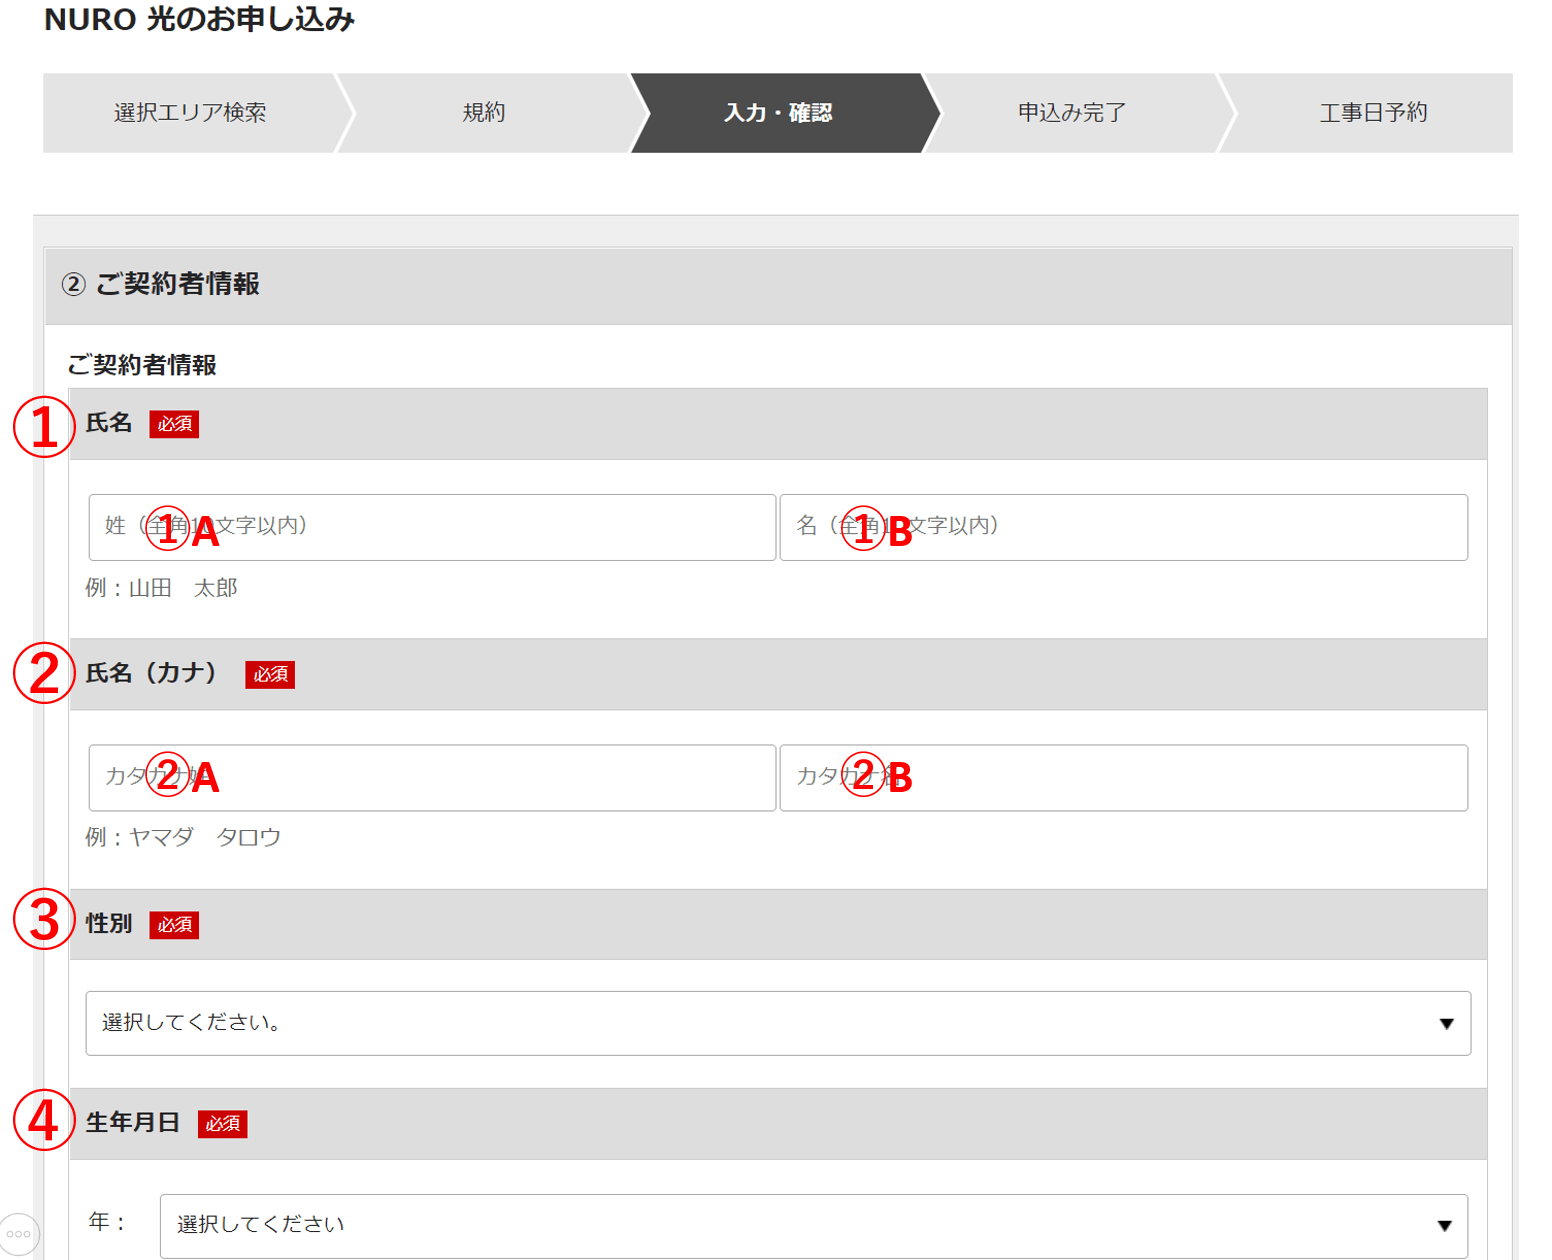
Answer the questions shown above as follows.
①Name(in alphabet): Type in your name. You will see 2 boxes to fill. Fill them in as follows. ①A: Surname in Alphabet, ①B: First name in Alphabet.
②Name(in katakana): Type in your name. You will see 2 boxes to fill. Fill them in as follows. ②A: Surname in Katakana, ②B: First name in Katakana.
③Gender: See the following image for details.

③Gender: When you click on the box, it will give you two choices. Choose from “Male”(③A) and “Female”(③B).
Keep scrolling down.
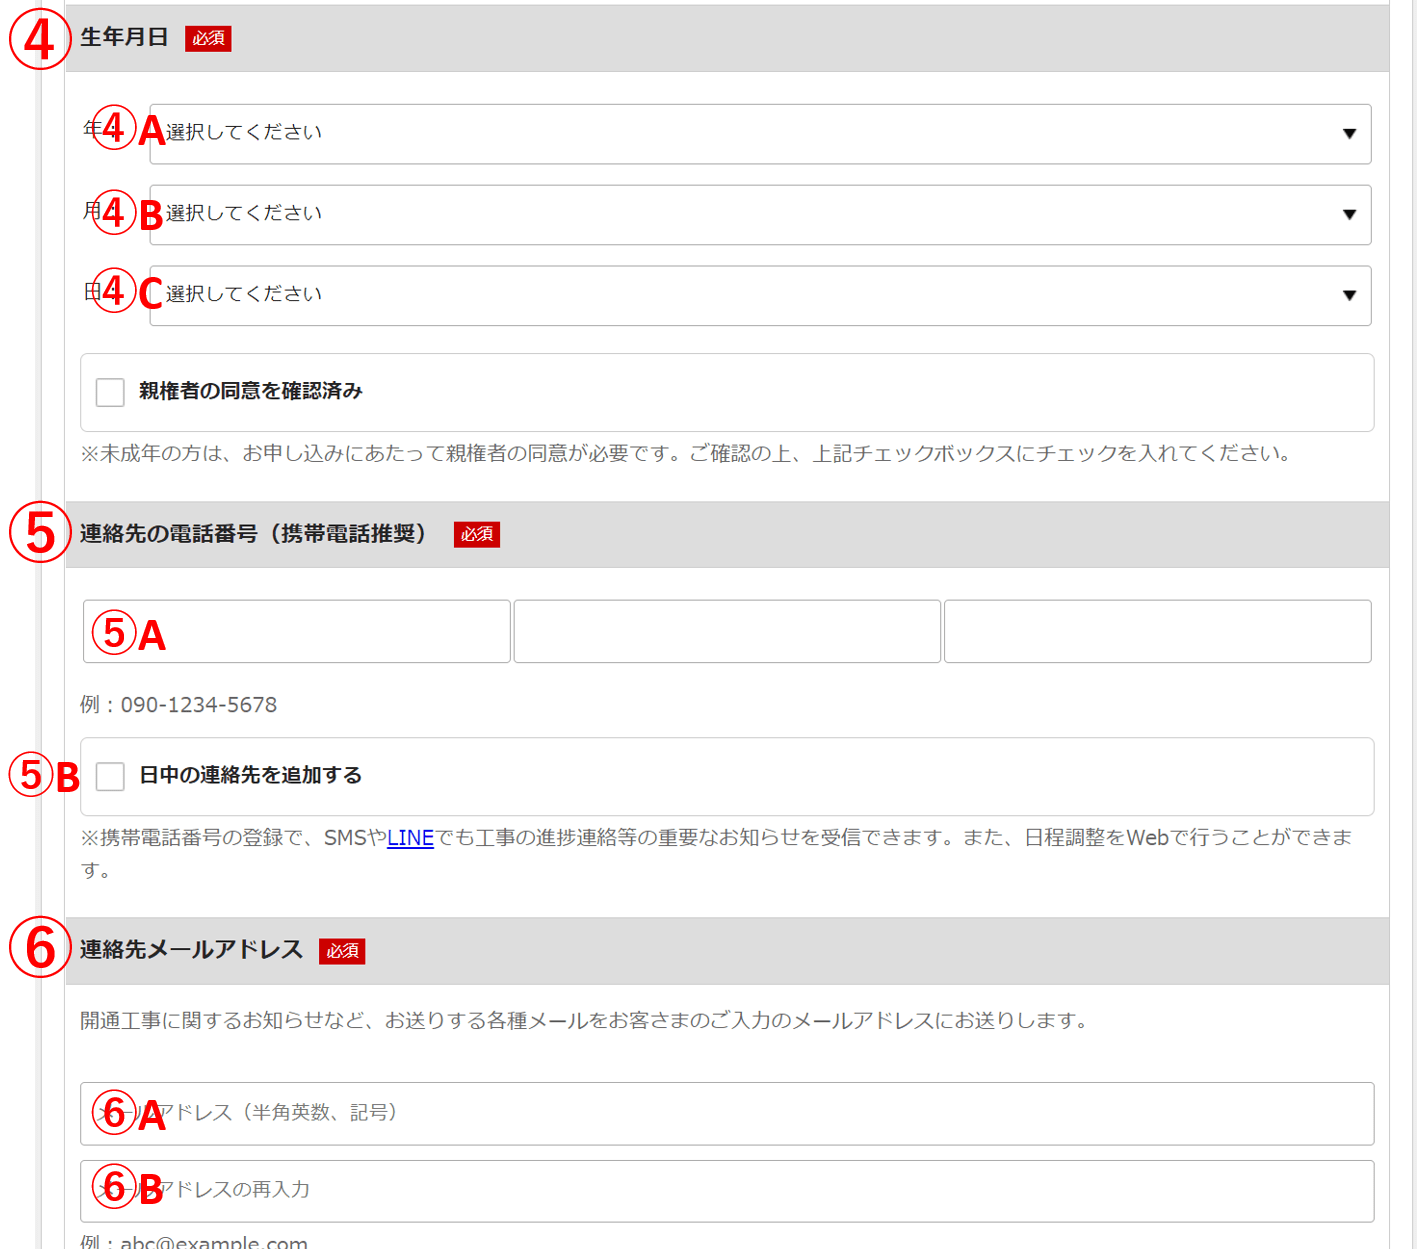
④Date of birth: Select your date of birth as follows. ④A: Year, ④B: Month, ④C: Day. In the case that you are under 20 years old, click on the check box right under ④ to show that you have your parents’ consent.
⑤Phone number: Type in your phone number in ⑤A. In the case that you would prefer to receive phone calls in another number during business hours, then click on the check box ⑤B.
⑥Email address: Type in the email address where you will like for the company to send you info about the installation. Type the email address in ⑥A, then re-type the same address in ⑥B.
And keep scrolling down.
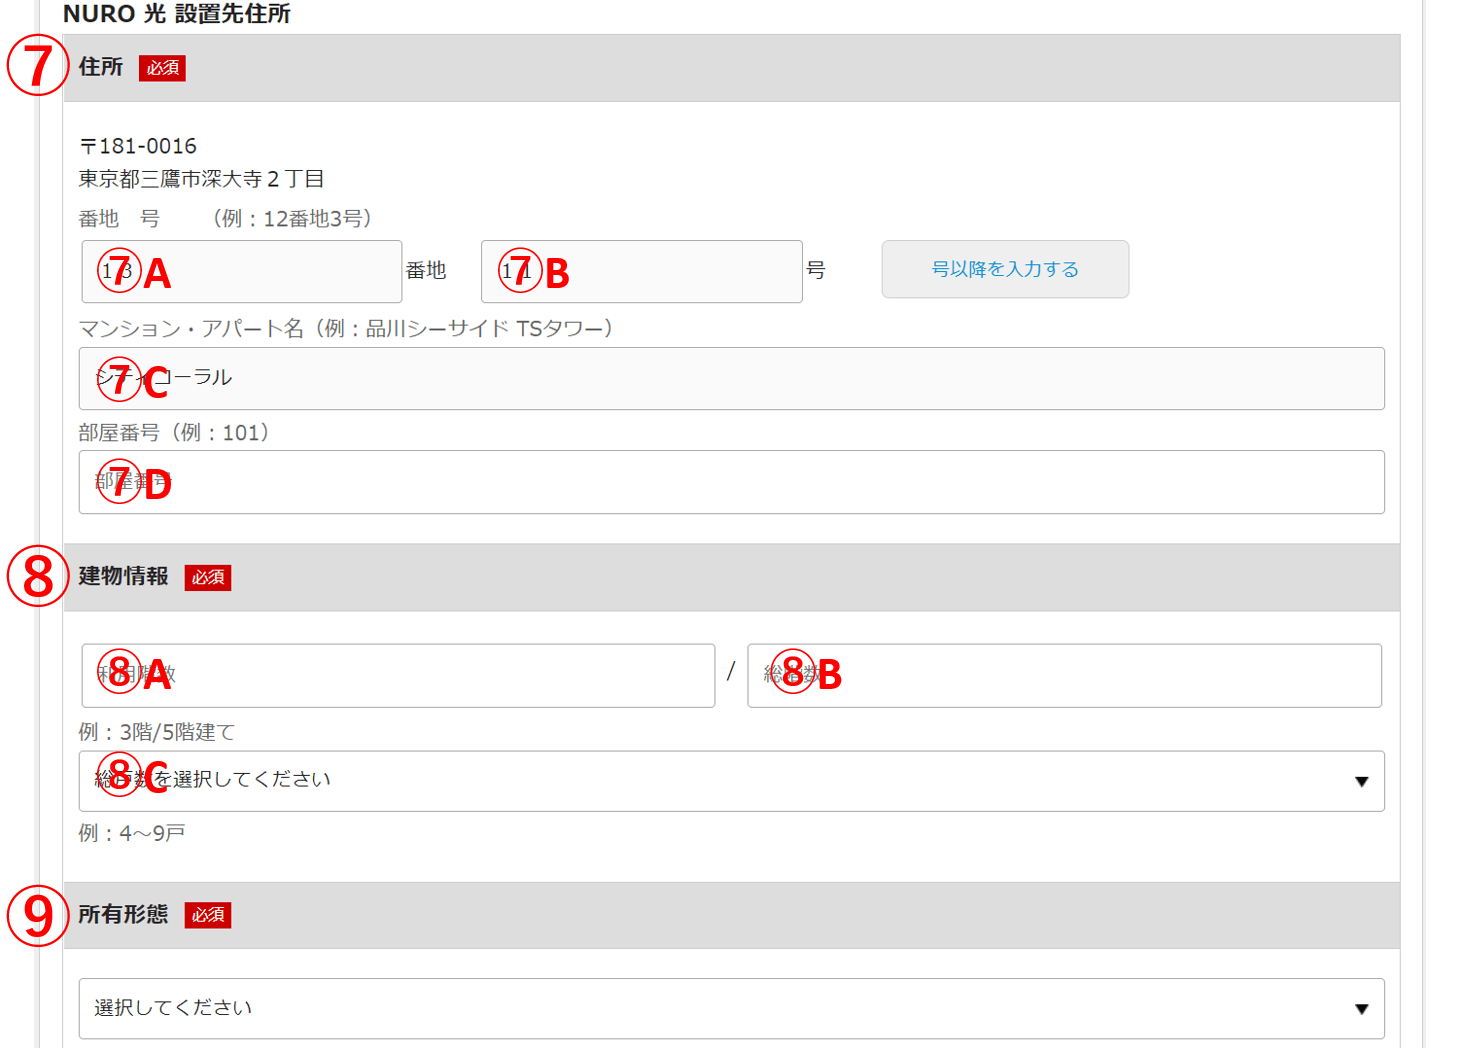
⓻Address details: Type in what follows the street number (⓻A and ⑦B). Then type in apartment name (⓻C) and room number (⓻D).
⑧Details of building: Type in the floor number in which your room is located(⑧A) and the total number of floors in the building (⑧B). Then type in the total room numbers(⑧C).
⑨Rented property or Bought property: See details in the following image.

⑨Rented property or Bought property: Choose between Rented property (⑨A), Bought property (⑨B), and Second-hand rental property (⑨C).
After this, keep scrolling down.
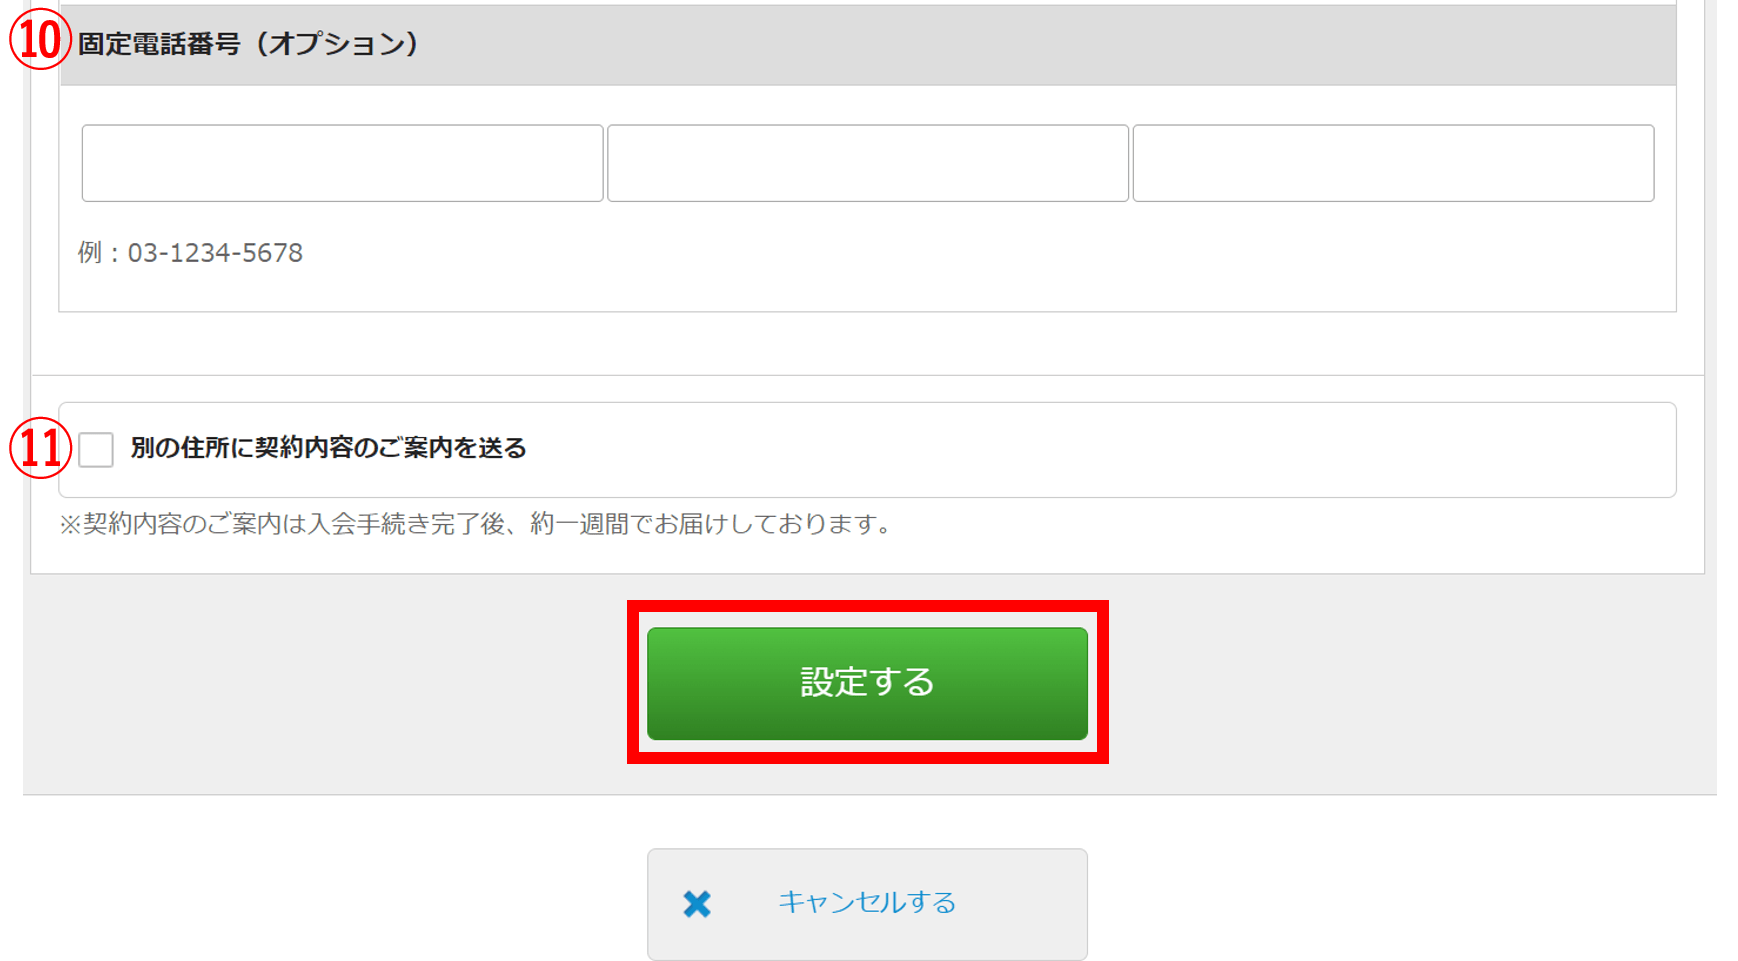
⑩Fixed-line phone: Type in your fixed-line phone number if you have one. This is an optional question.
⑪Send documents to another address: Documents regarding the details of the service as well as the terms and conditions will be sent to your home approximately 1 week after you subscribe. If you would like to receive these documents at another location other than your home, click on the check box.
After this, click on the big green button to proceed.
5. Filling in your payment information
After you have clicked on the green button in the previous part, you will be taken to the confirmation page again.
Now that you have already filled in your personal info, it is time to fill in the payment information. Scroll down from the confirmation page.
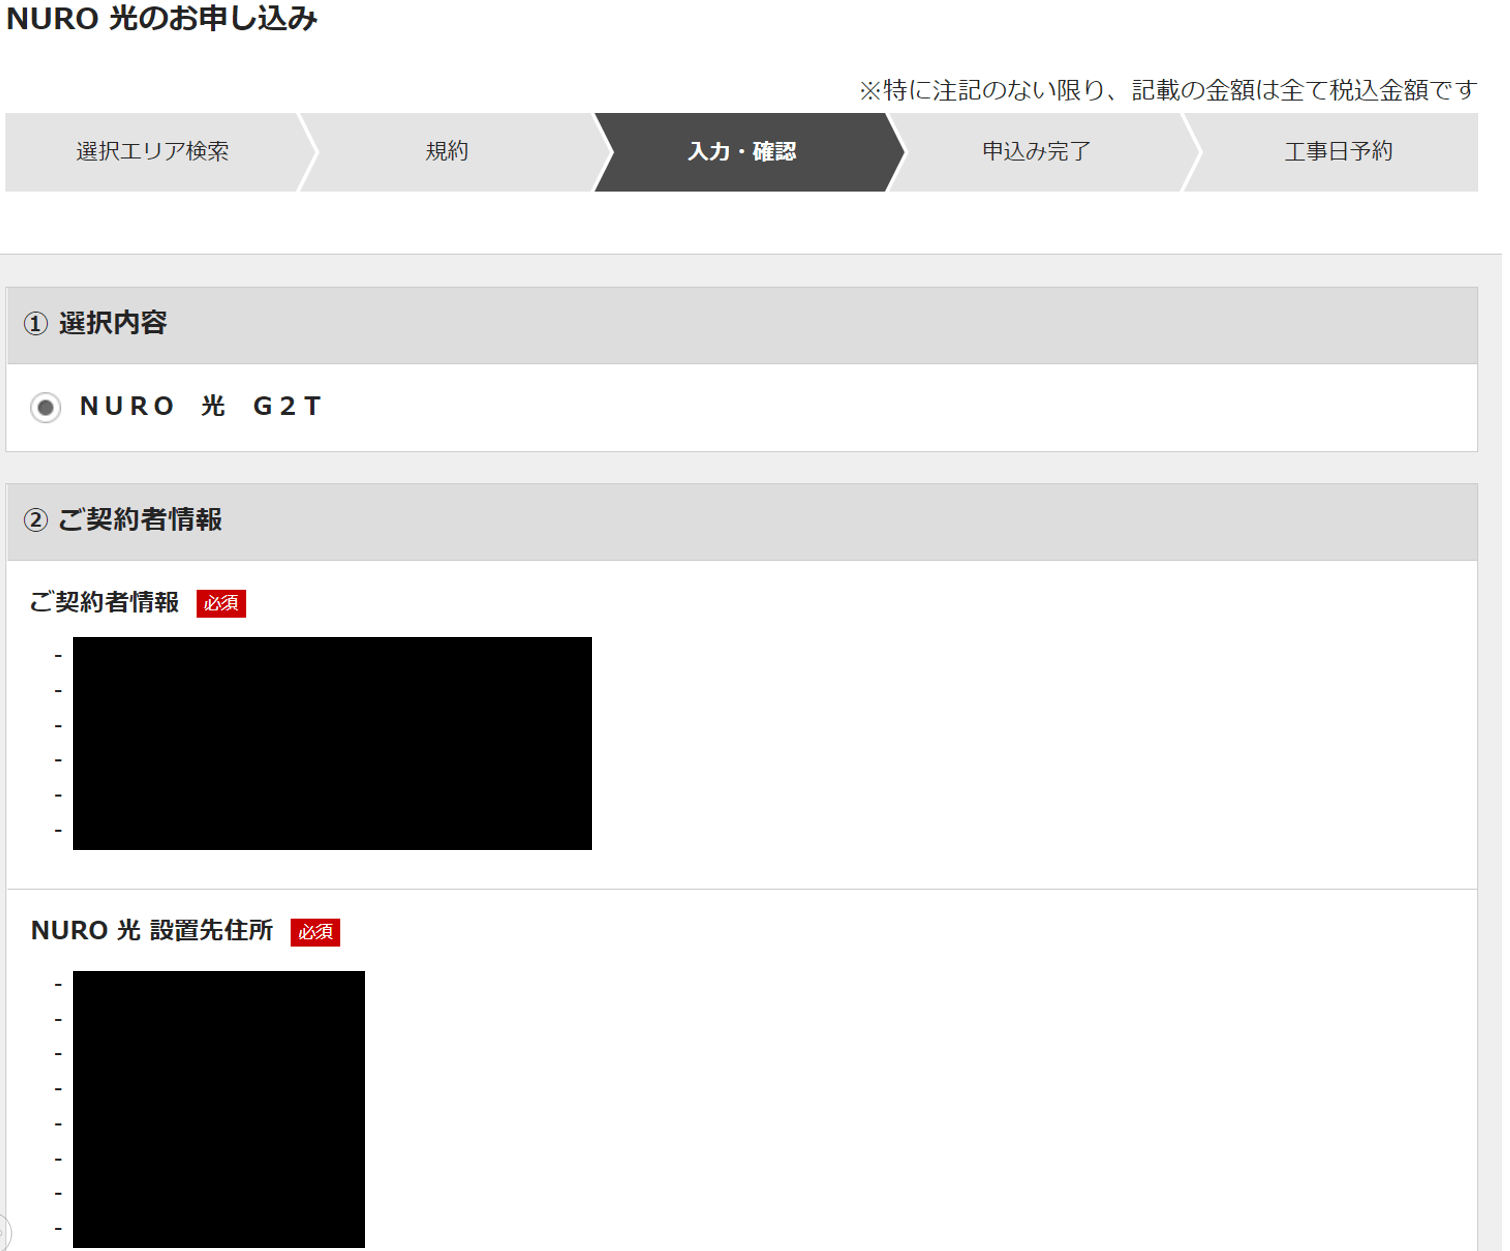
When you scroll down, you will find the following image that says “③お支払情報”(Payment method). Click on the button to proceed.

After you click on the button, you will be taken to the payment info page as shown below.
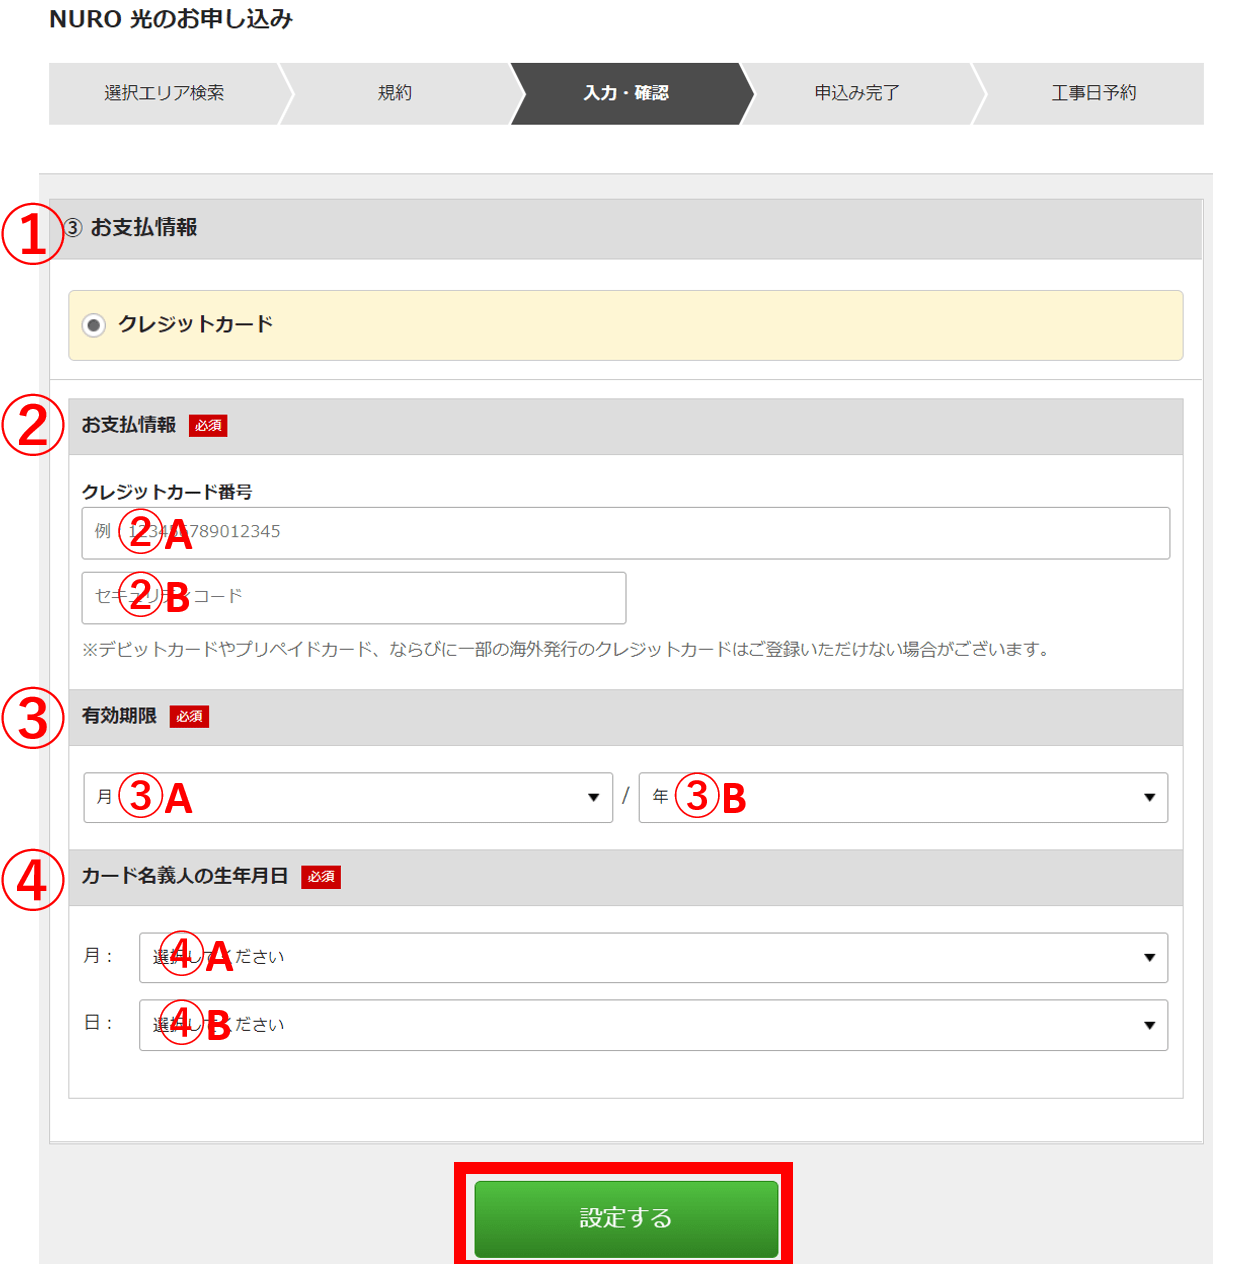
Answer the questions shown above as follows.
①Payment method: Here is where you choose how to pay. However, as you can see, there’s only one choice here which is “Payment by Credit card”.
②Credit card information: Type in your credit card number(②A) and the security code(②B).
③Credit card expiration date: Choose the month(③A) and year(③B) of the expiration date.
④Date of birth: Choose the month(④A) and date(④B) of the birthday of the credit card holder.
After filling in all these questions, click on the green button.
6. Confirmation Page
When you click on the green button in the last part, it will take you one last time to the confirmation page.
Scroll down to the bottom of the page and you will see as shown in the image below.
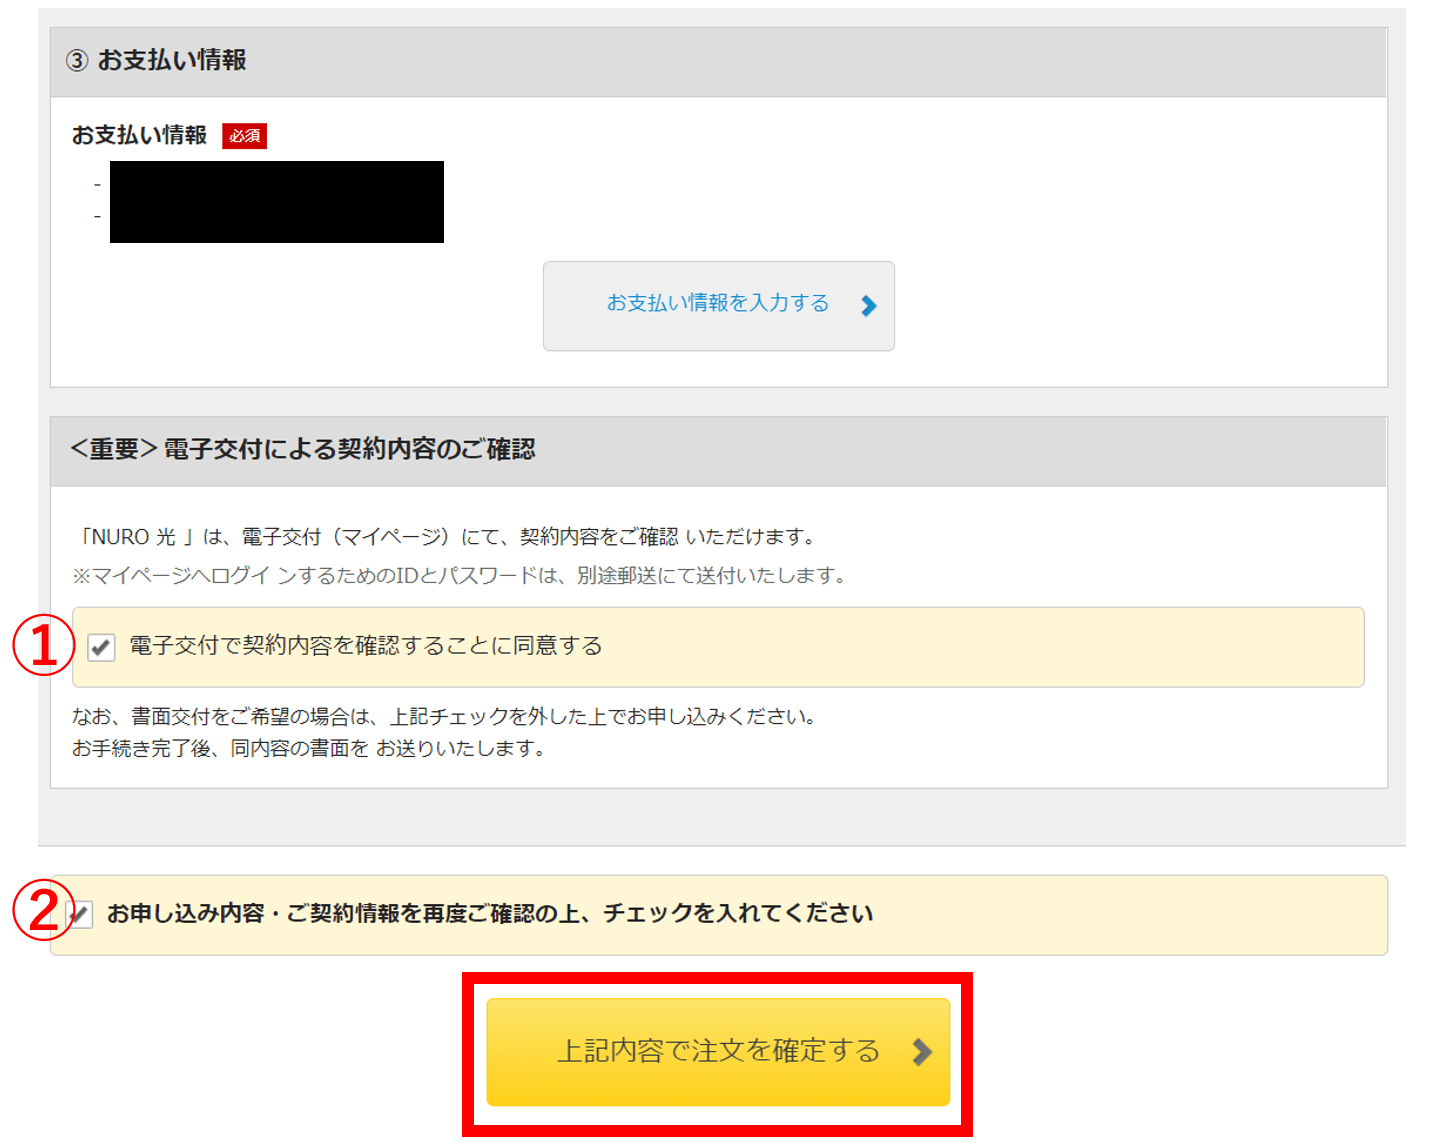
Below the part of payment information, a new section will appear as shown above.
Check the following points.
①”I will check the electronic version of the service contract”: About a week after you finish subscribing, you will receive a mail with an ID and Password to log in to the Nuro Hikari My page. You will be able to check the contract on that website. In the case that you prefer getting a physical copy of the contract, then do not check the box.
②”I have double-checked the info that I have provided as well as terms and conditions”
After you have checked these two points, then click on the yellow button to finish the subscription process.
After subscribing online
After you have finished the subscription process, you will first receive a confirmation email with the details of your subscription. In the case that you would like to rent a pocket wifi device, the details of this will be indicated in this email. Here is also when you decide the dates for the installation(the installation process is divided into two days). In the case that you choose a Saturday, Sunday, or Holiday, an additional 3,300 yen fee will be charged.
Then, about a week after you have subscribed, you will receive via post mail a form with your ID and Password for logging in to the Nuro My Page website.
After this, you just need to wait for the day of the installation. Once the installation is done, you will have uninterrupted high-speed internet for yourself!
If you are interested to subscribe to Nuro Hikari, you can subscribe online from the link below.
▶ Subscribe to Nuro Hikari online here
Before you subscribe to Nuro Hikari
There are a few things that you should check before you subscribe and pay for internet service.
First of all, Sometimes, the apartment or sharehouse will have internet service included. Be sure to check this before you decide on subscribing to an internet service.
Next, if you haven’t actually decided what company or service to choose for your internet connection, here’s an article where we compare the most popular internet services in Japan.
▶ Check the best internet service options in Japan!
Also, if your stay in Japan is less than a few months, I would recommend for you rent a pocket wifi. Here is a link to an article where we compare several pocket WiFi services.
▶ Check the best pocket WiFi options in Japan!
I hope this article was helpful. Although Nuro Hikari does offer customer support, this support is generally only in the Japanese language. It would be a good idea to have someone that could help you with the language in the case that it is difficult for you.
If you want to know more about internet services in Japan, check out the following articles!
▽Related Articles▽
▼Editor’s Picks▼
Written by
Born and raised in Costa Rica, I started living in Tokyo from college. I love traveling within Japan & around the world. Since I wasn’t born in Japan, I know the cultural impact that you can get when visiting Japan for the first time and what you might be worried about before your trip. And I’ve lived long enough to somewhat understand the nuances of the Japanese culture that make this country such an attractive place to visit. Hopefully I can provide to you both the information you’re looking for and the information you didn’t know you needed to know.


